Emergency Lighting Controls

LDrive E

DALI Emergency Controller


1. Introduction 

Emergency Lighting Controls play a crucial part in the overall safety standards of a building. These systems ensure that lights remain alight during a power outage allowing occupants to easily locate the exits should they need to evacuate the building. Hence, selecting a reliable emergency lighting system is of paramount importance for builders.


What are the challenges faced in traditional emergency Lighting?


Emergency lighting systems have been around forever but traditional systems have numerous challenges that make them cumbersome to set up and maintain. Some of the major ones include


• High Costs – The overall costs include not only how much you pay for the emergency lighting itself, but also the cost of installation, testing and maintenance


• Resource-intensive – Testing and maintenance needs to be physically performed


• Time-consuming – Wiring takes a long time. Additionally, manual testing is time-consuming as well


• Unreliable Reports – Reports need be maintained manually via spreadsheets which results in inconsistent and undependable data


• Unpredictable performance – It is difficult to gauge the health status of the connected emergency devices; hence you never know if they’ll work as intended


This is where SmartProControls emergency lighting comes in, and for a building owner, its features translate to


• Easy compliance with mandatory emergency lighting requirements 

• Significant savings – in terms of costs and resources 

• Safe environment for the occupants 


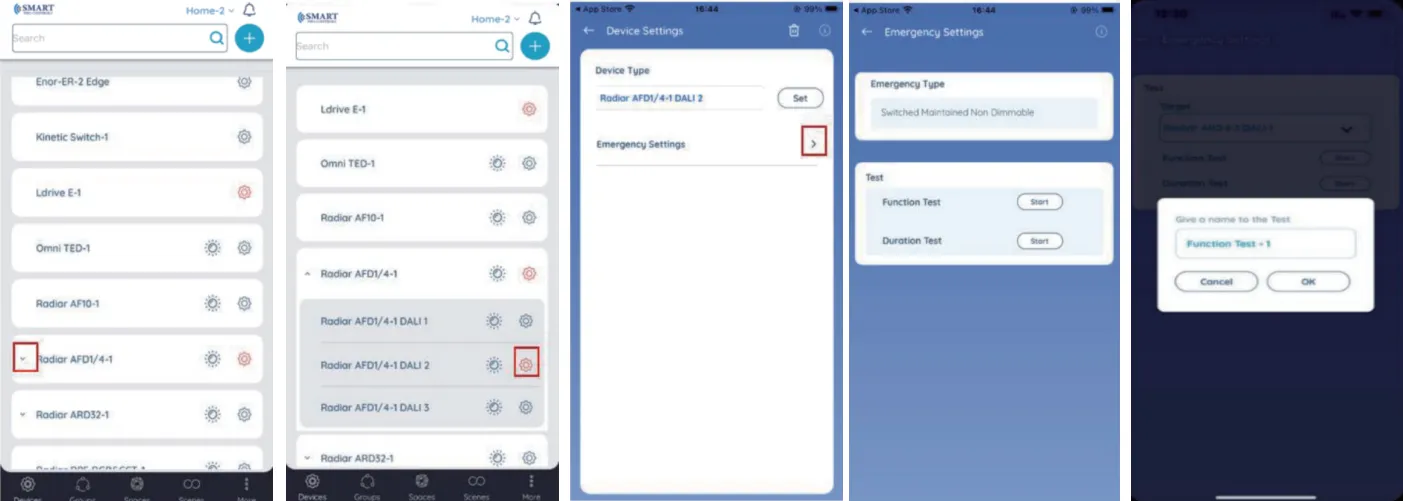
Emergency Control Device Directory

The following devices are equipped with emergency controls:


DALI-based devices:-

1. Radiar AFD1/4

Advanced control system featuring emergency shutdown capabilities and safety protocols.

2. Radiar ARD32

Industrial-grade device with integrated emergency response mechanisms.


Note :

Radiar DALI controllers support emergency lighting solutions with DALI-202 compliant self-contained emergency lights, which include an integrated battery, driver, and light source. We provide the controller, while users are free to choose DALI-202 compliant emergency drivers from their preferred manufacturers.

Additionally, we offer recommendations for suitable Emergency DALI drivers upon request to ensure compatibility and optimal performance.


Non-DALI devices:-

1. L Drive E

Standard emergency control functionality with fail-safe operations.


Note: L Drive E product series offers various types of emergency luminaires such as exit signs, bug eyes, downlights, 

etc.. These fixtures are designed with built-in batteries and require only a power connection to operate. No external   

emergency control or wiring is needed—simply connect power, and the luminaire will function as intended.


Note: Always refer to the manufacturer's documentation for specific emergency control procedures and safety guidelines for each device.


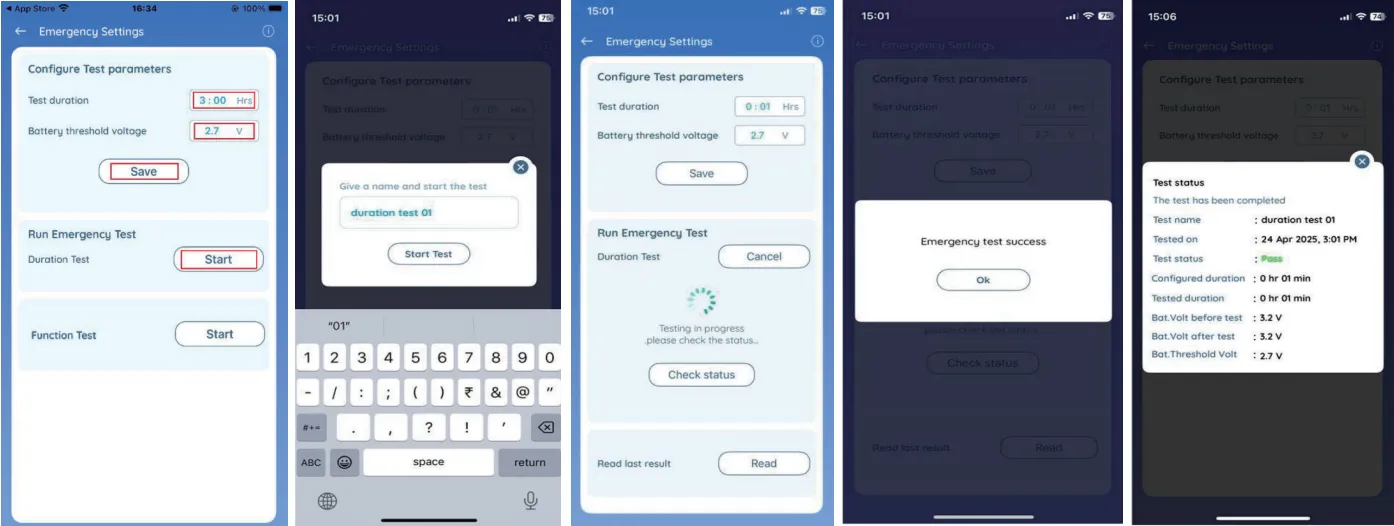
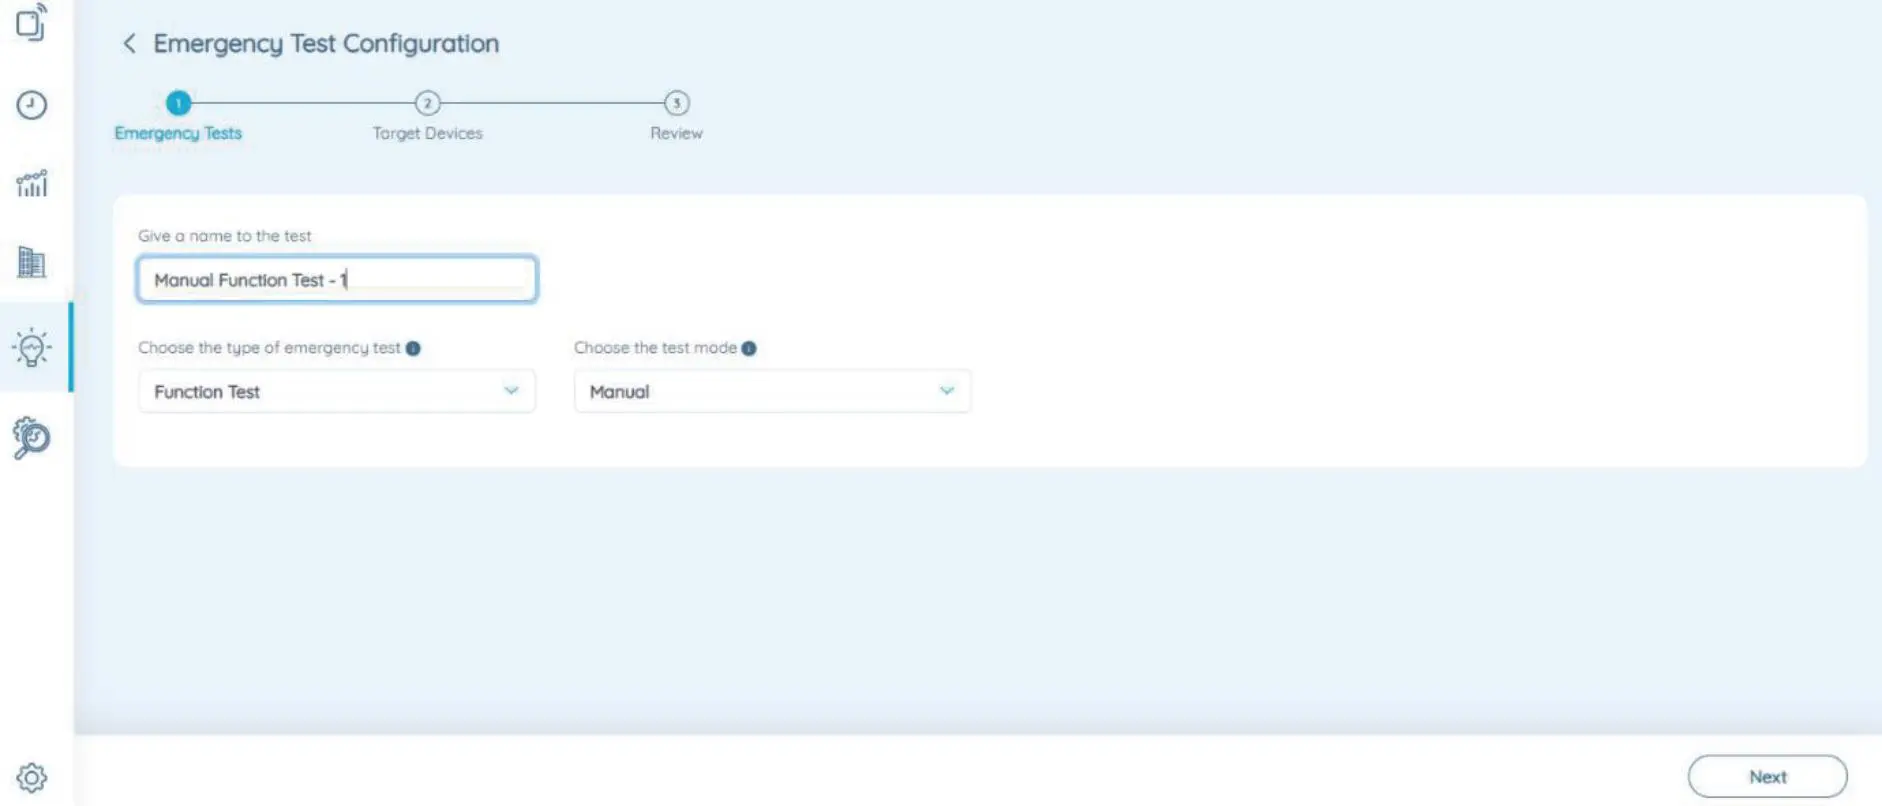
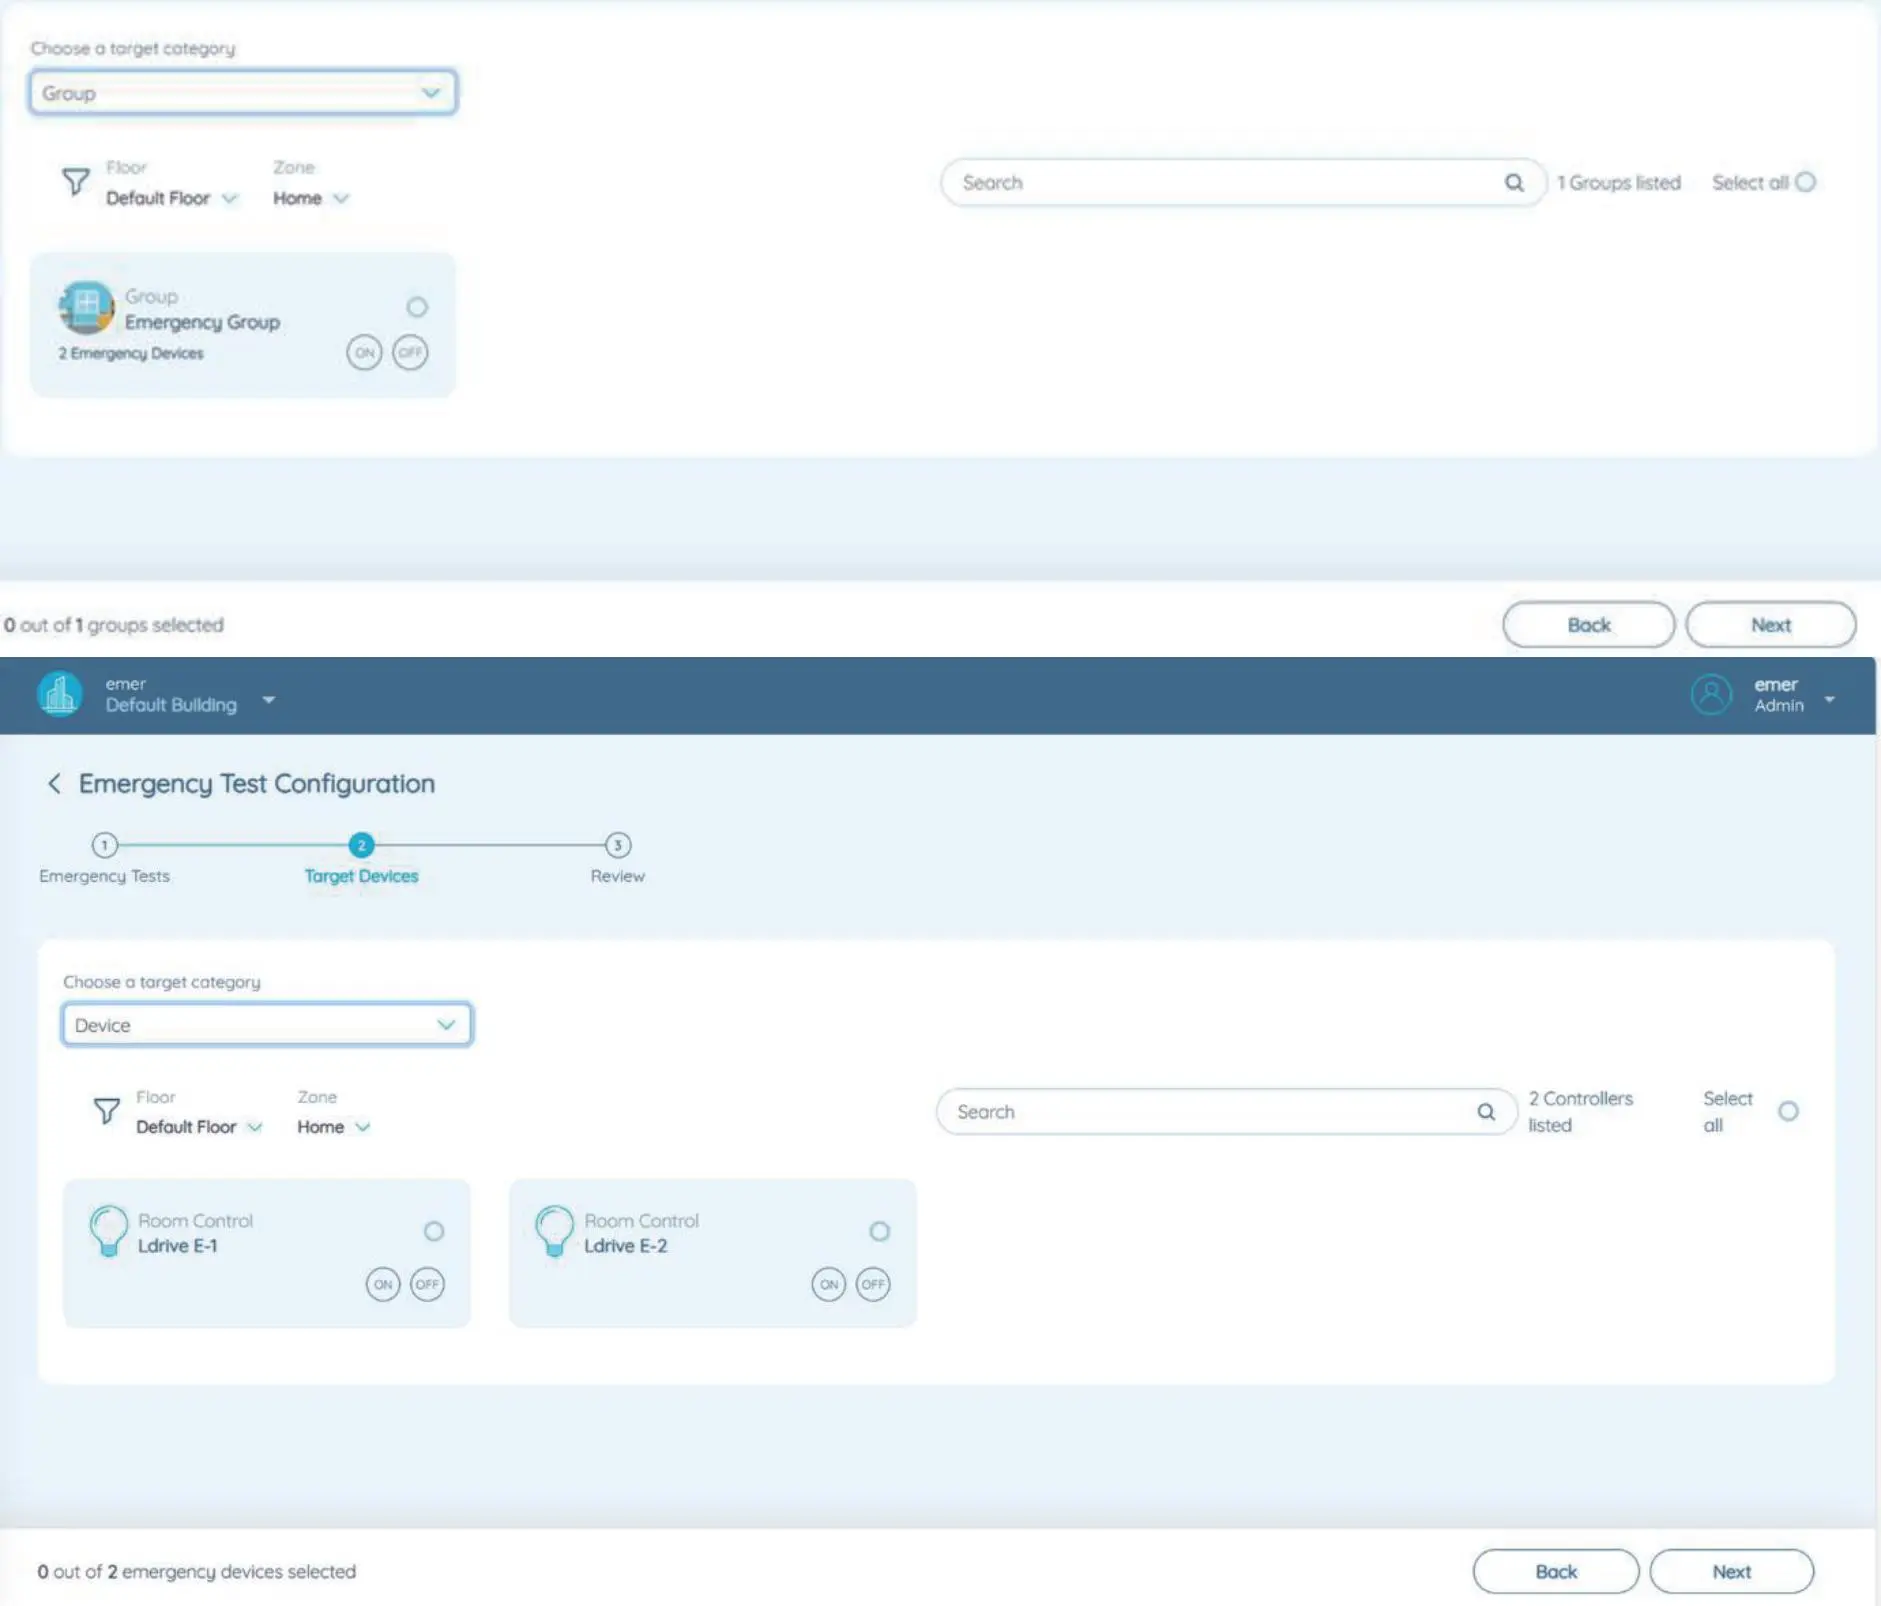
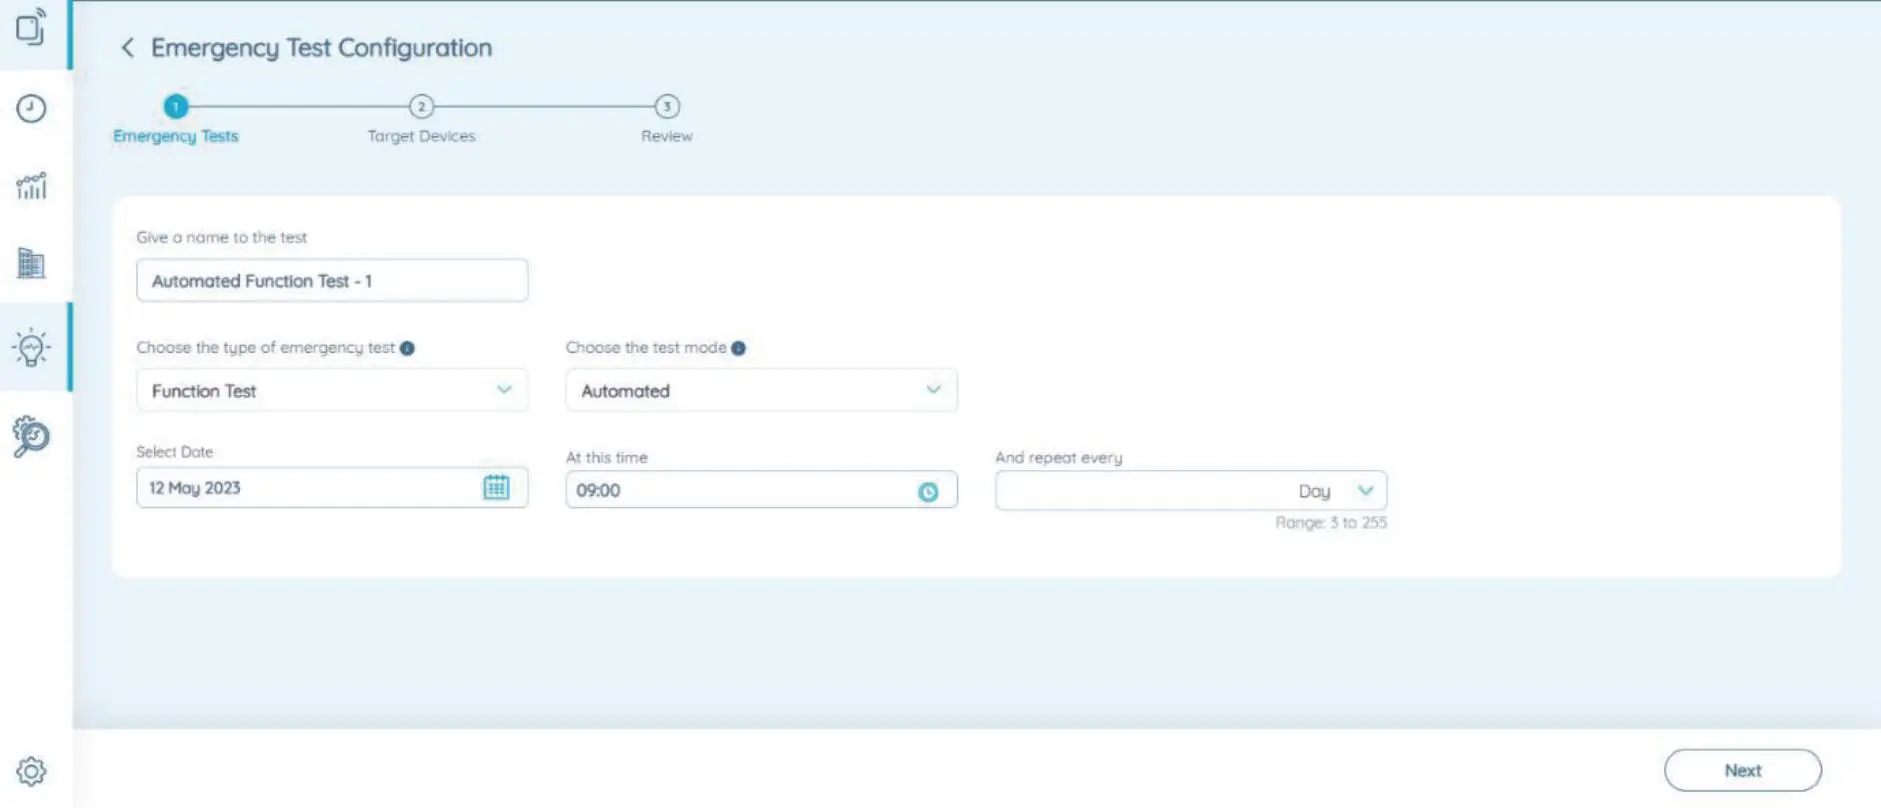
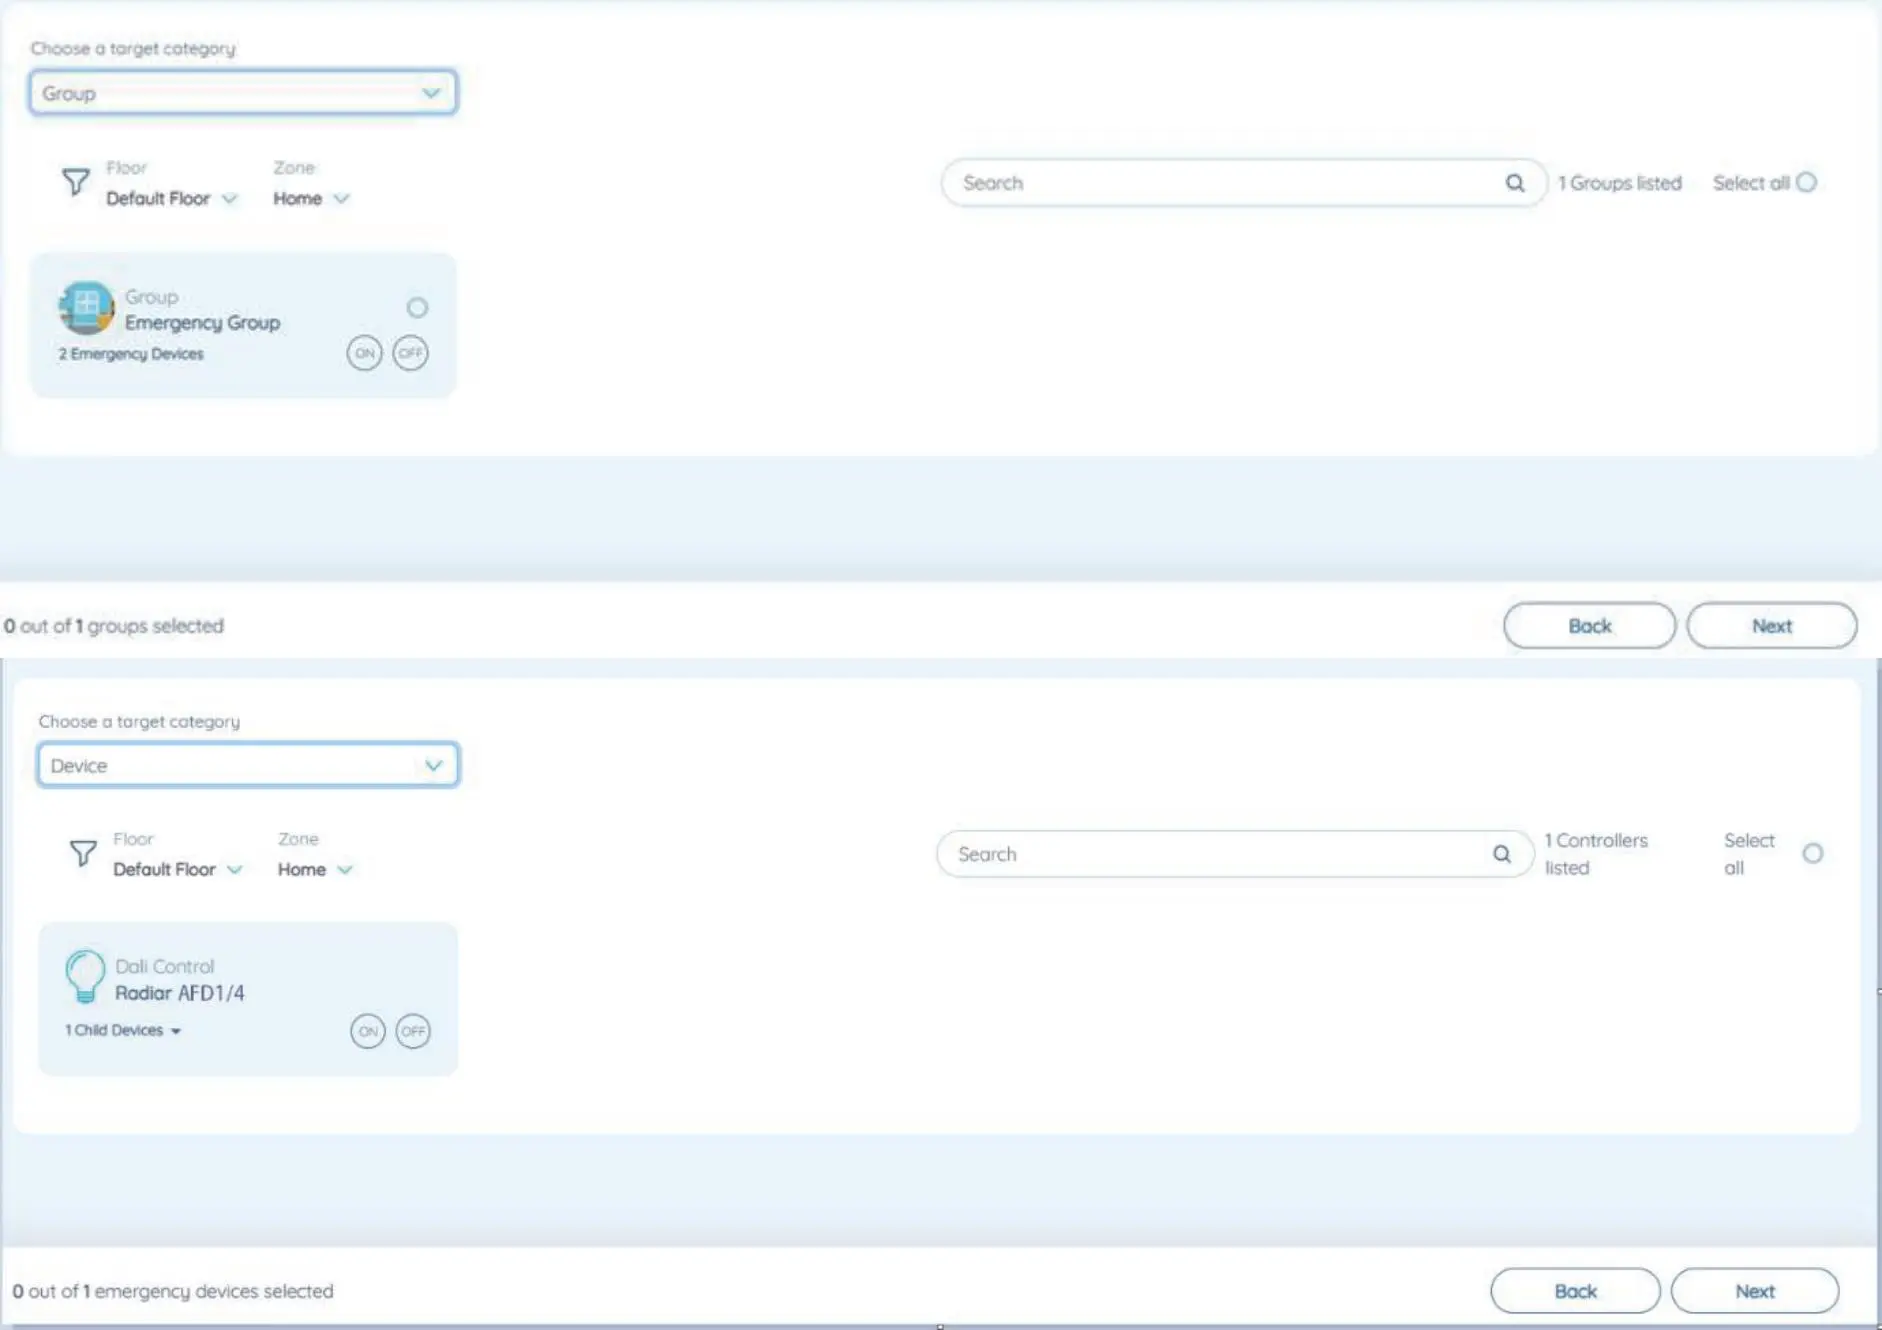
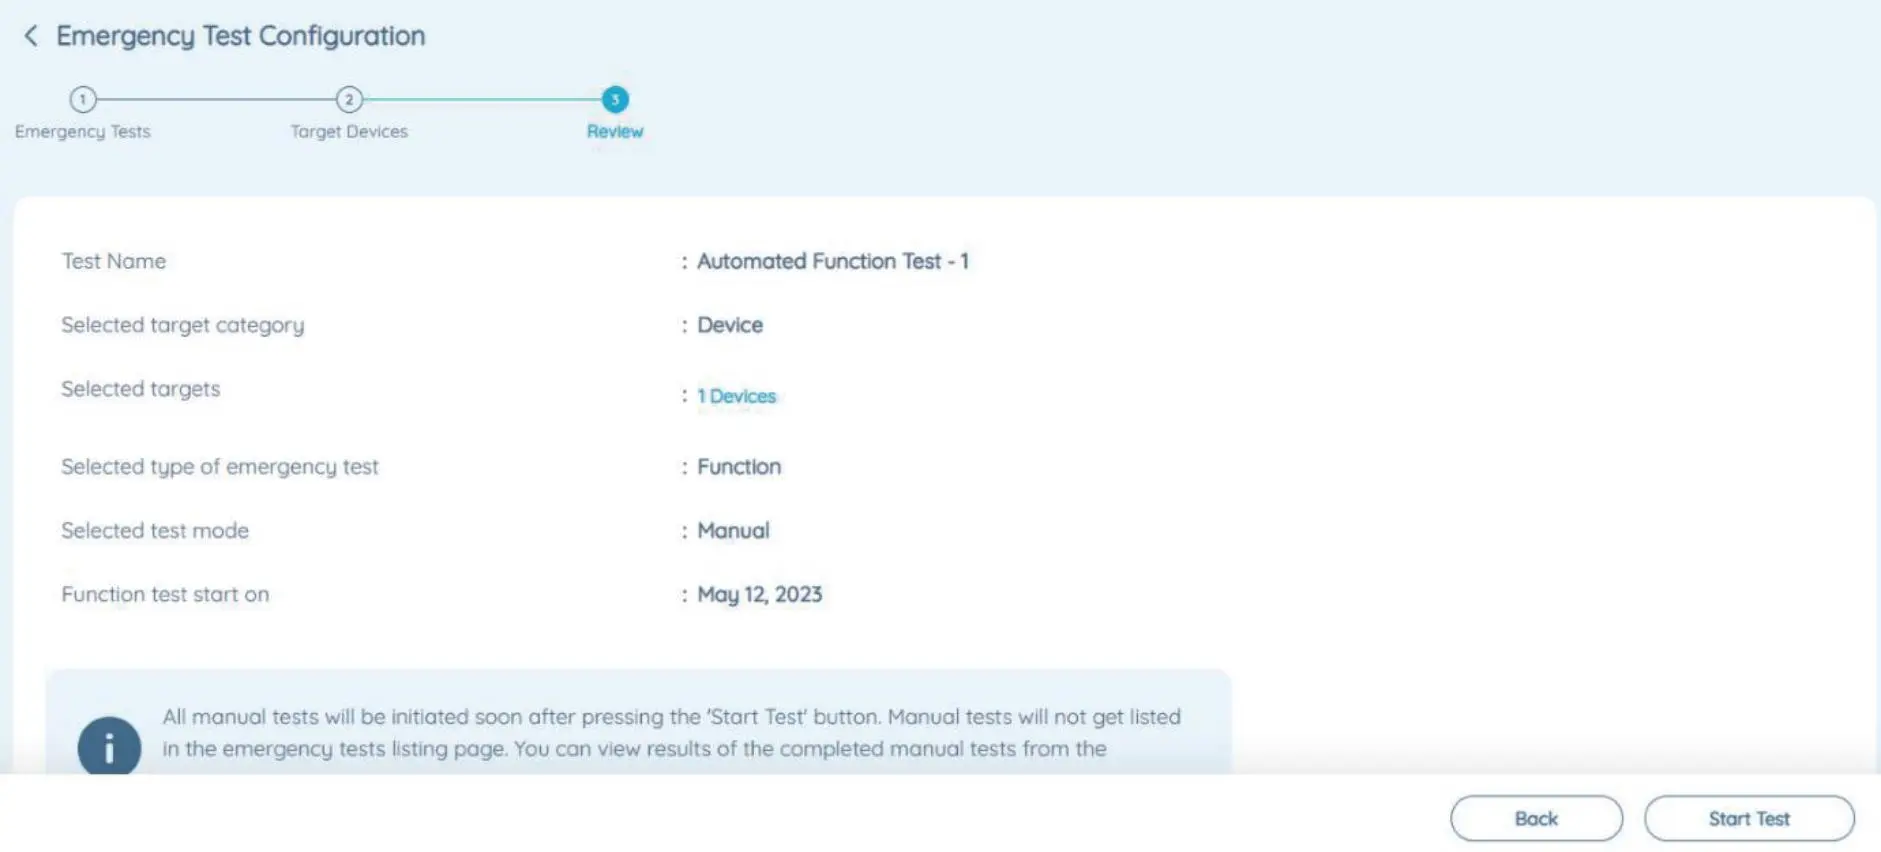
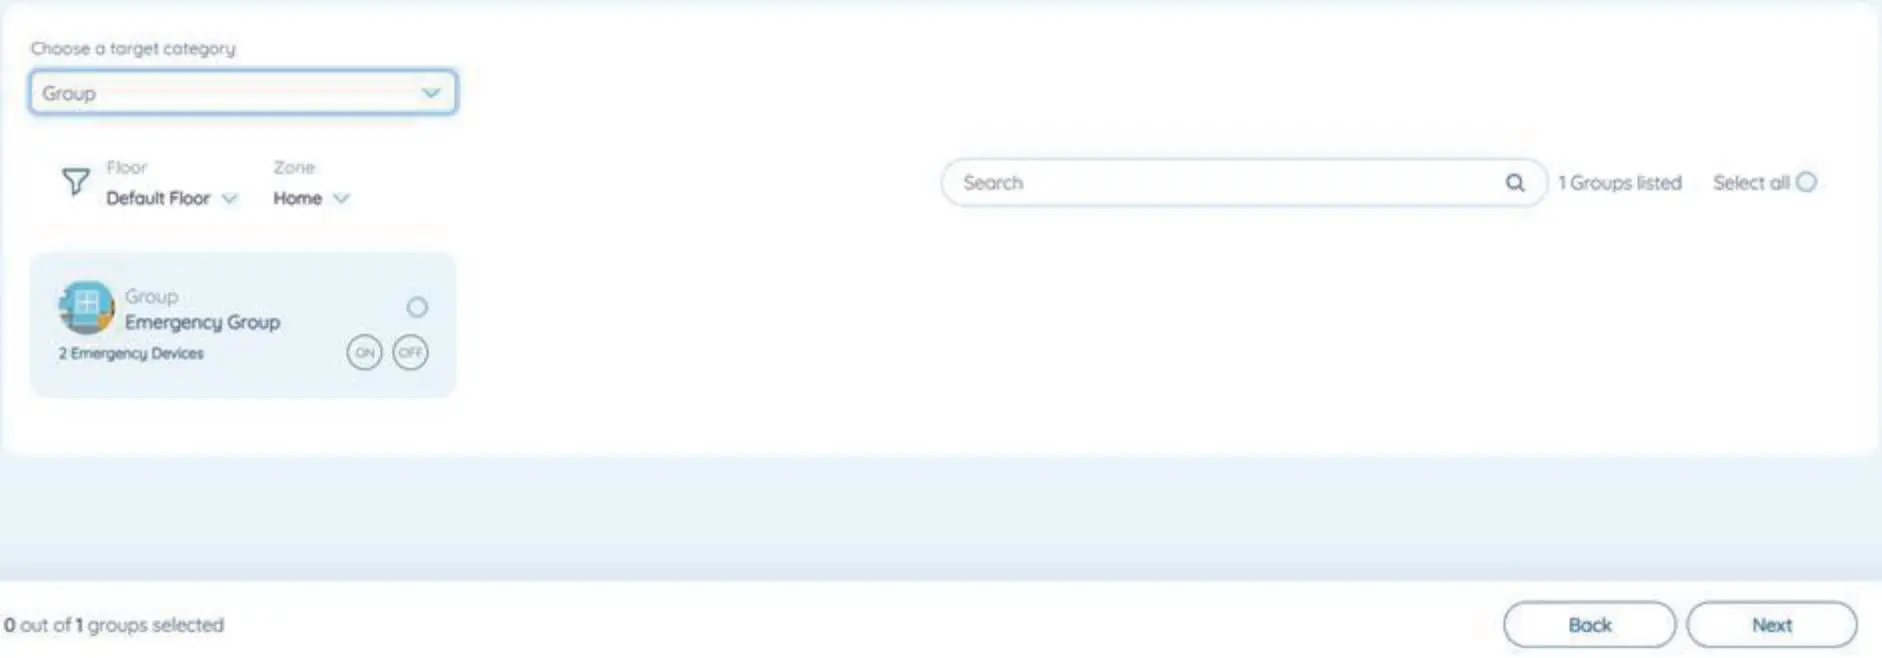
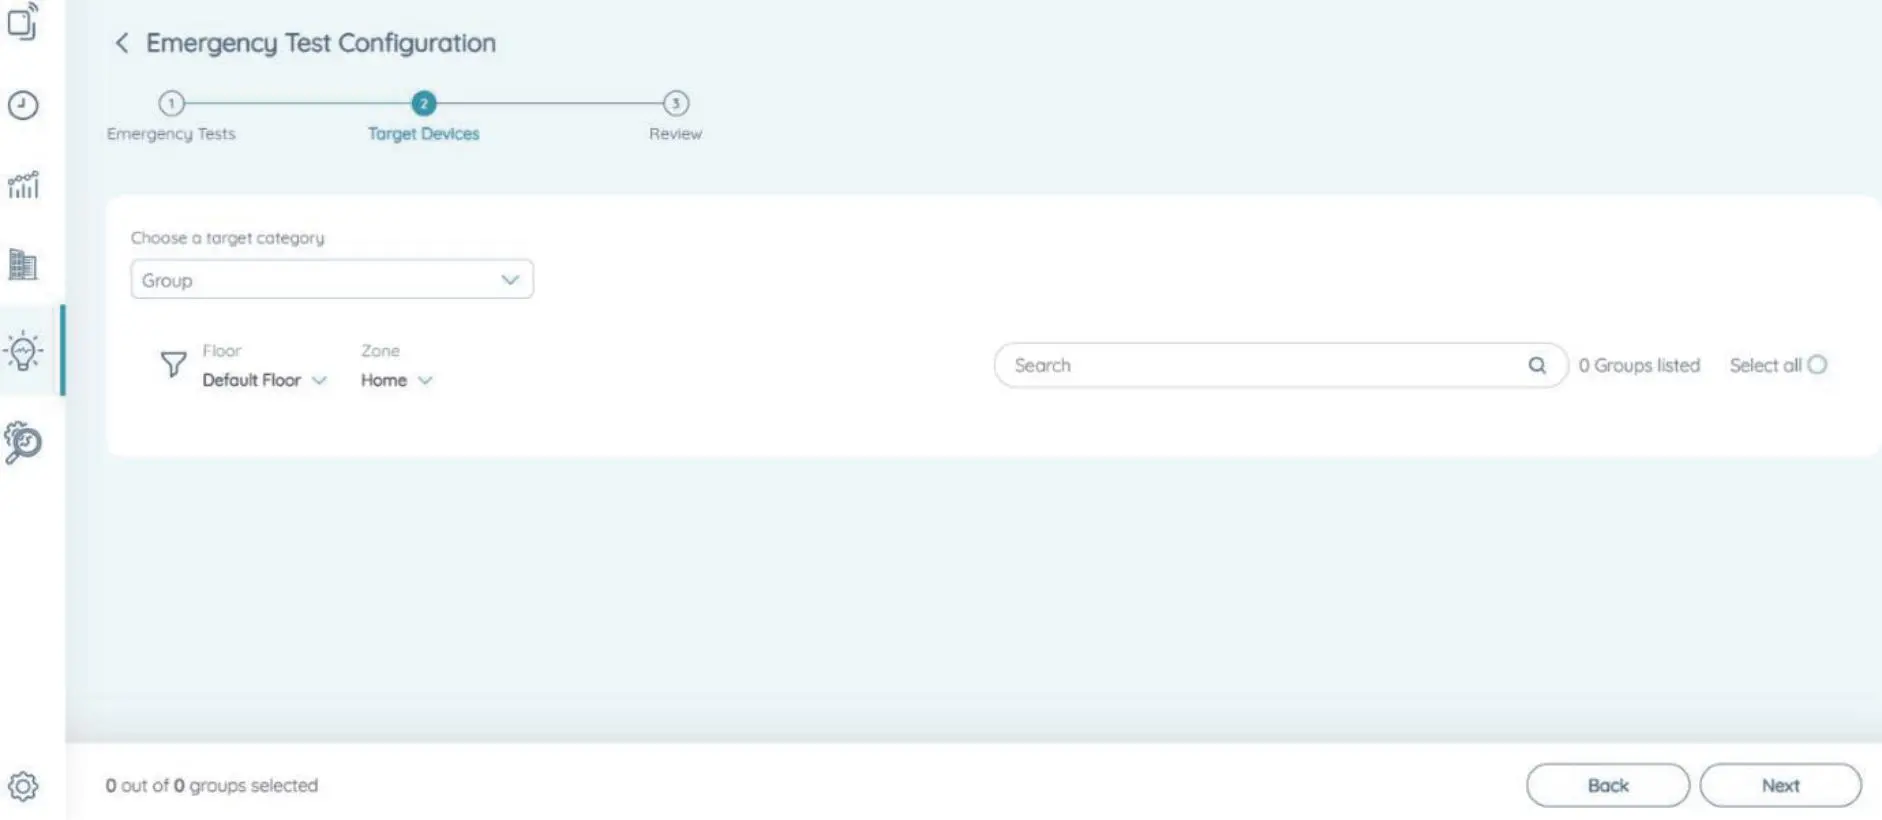
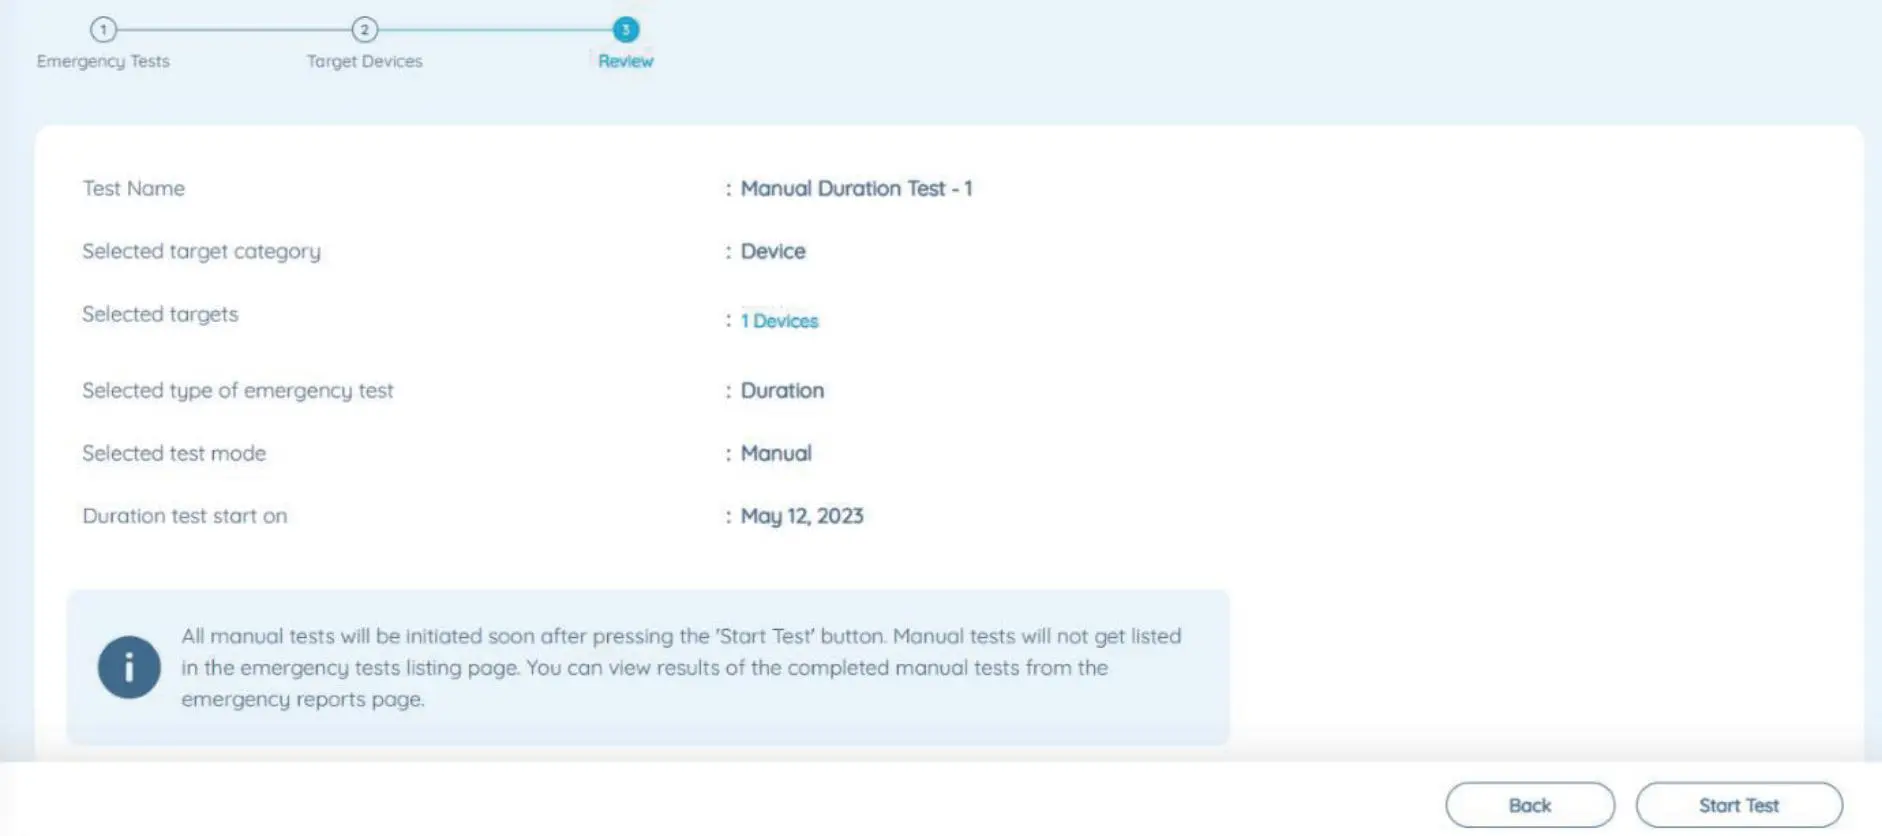
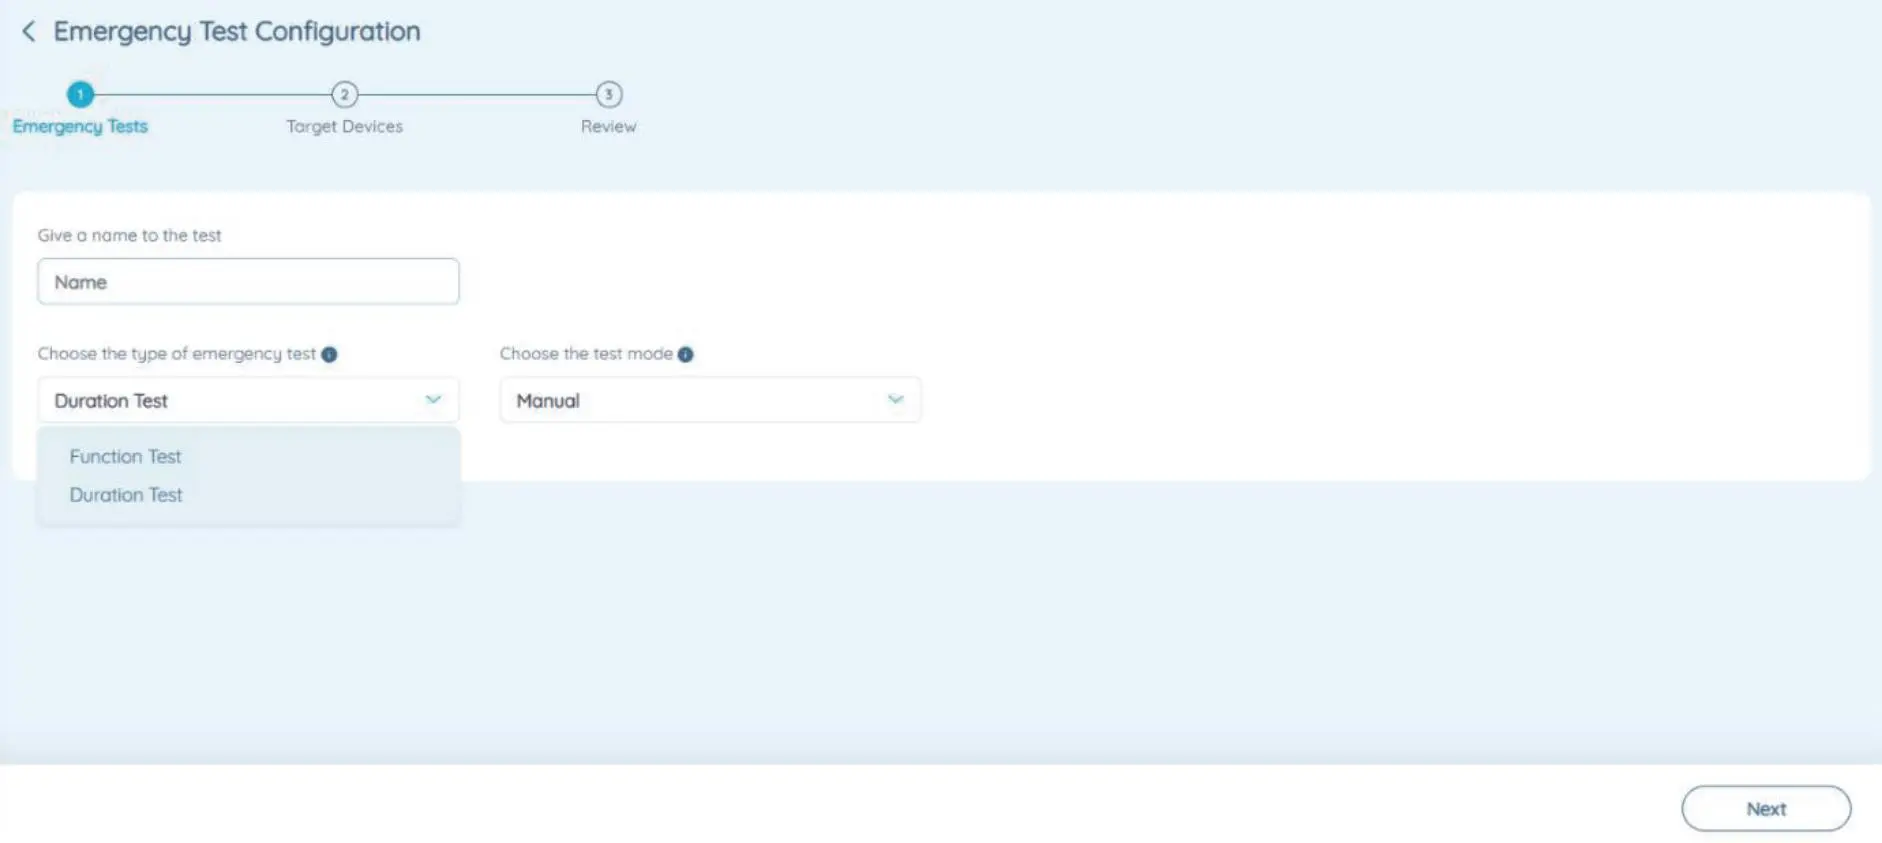
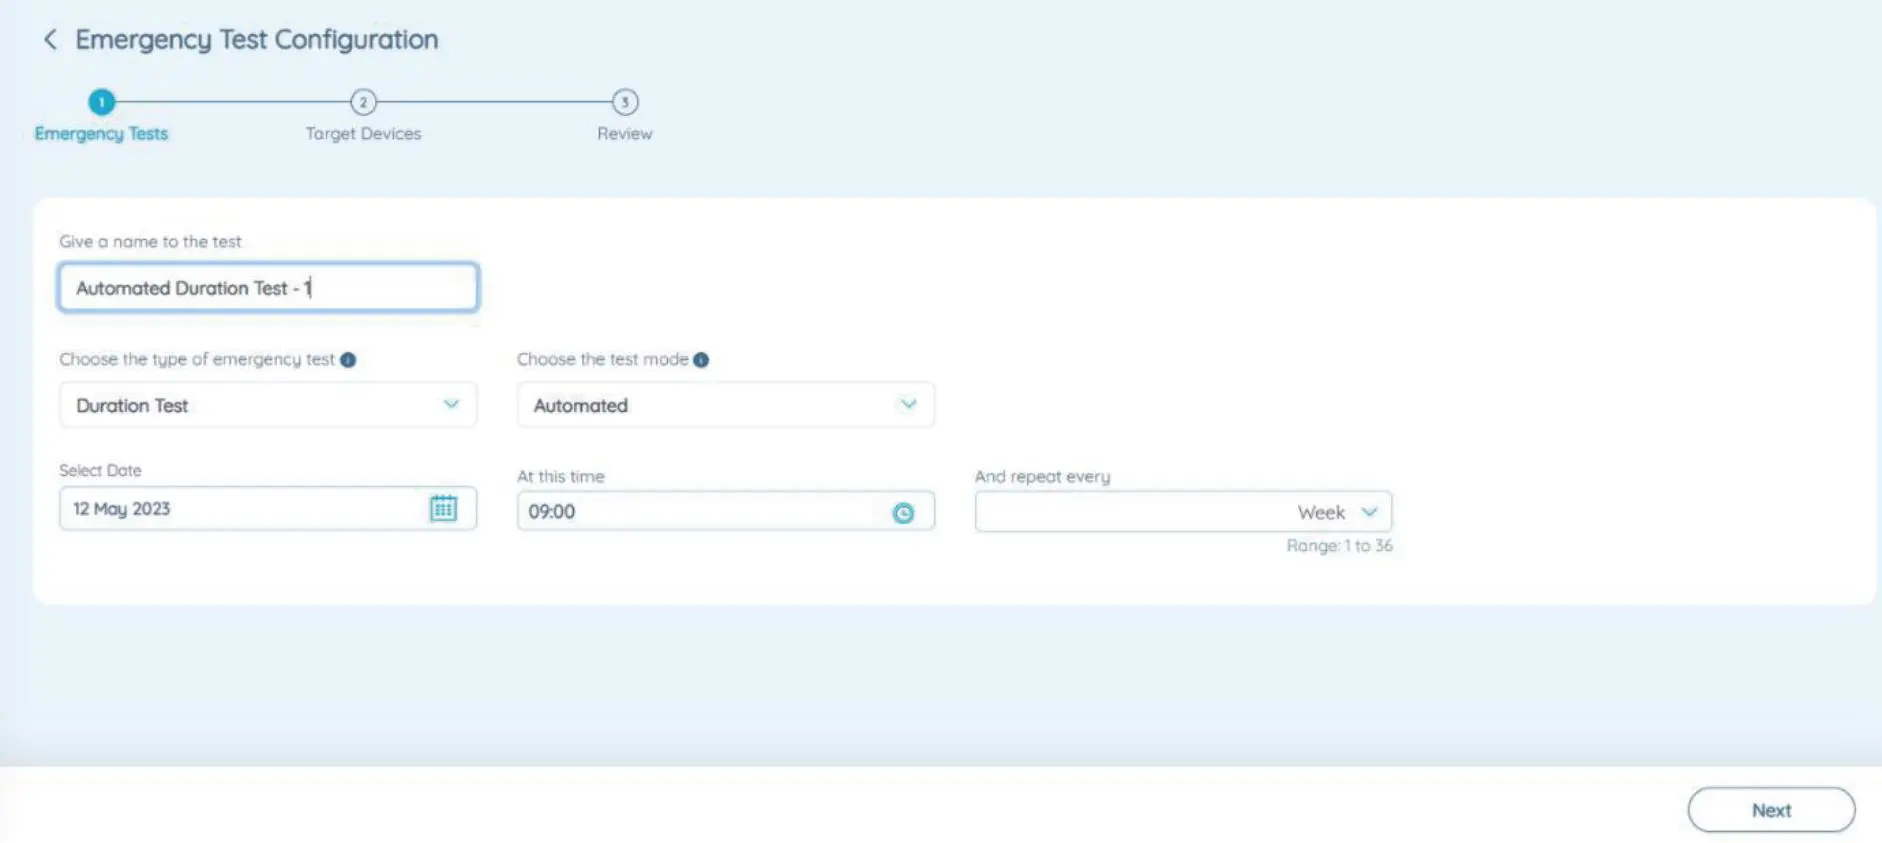
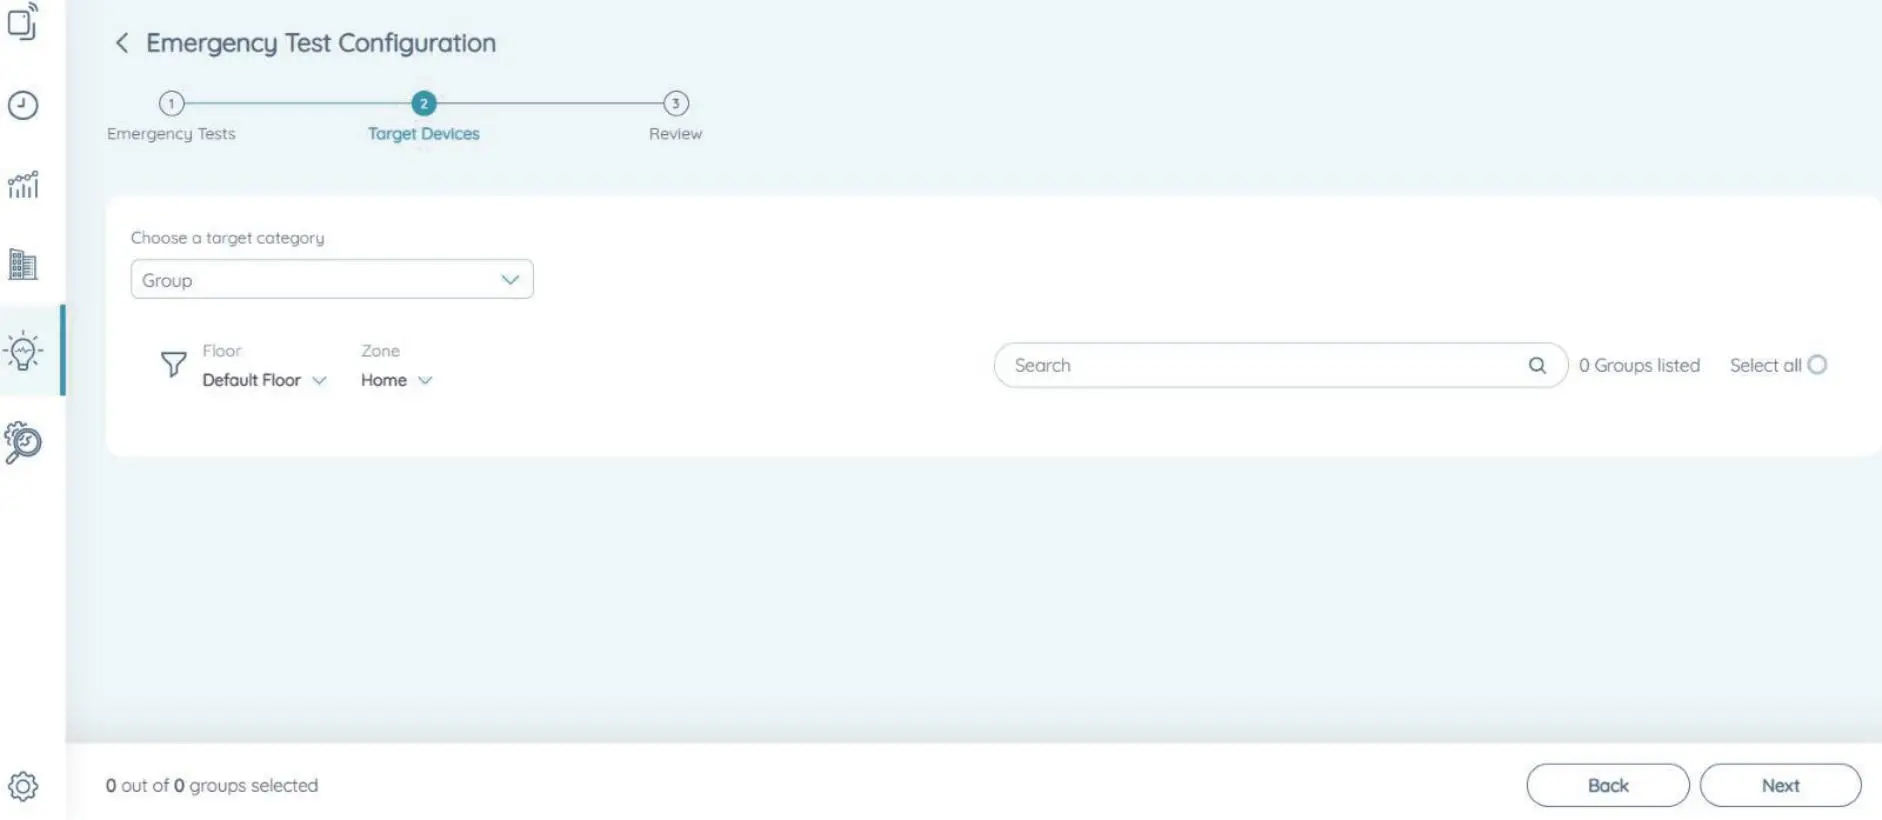
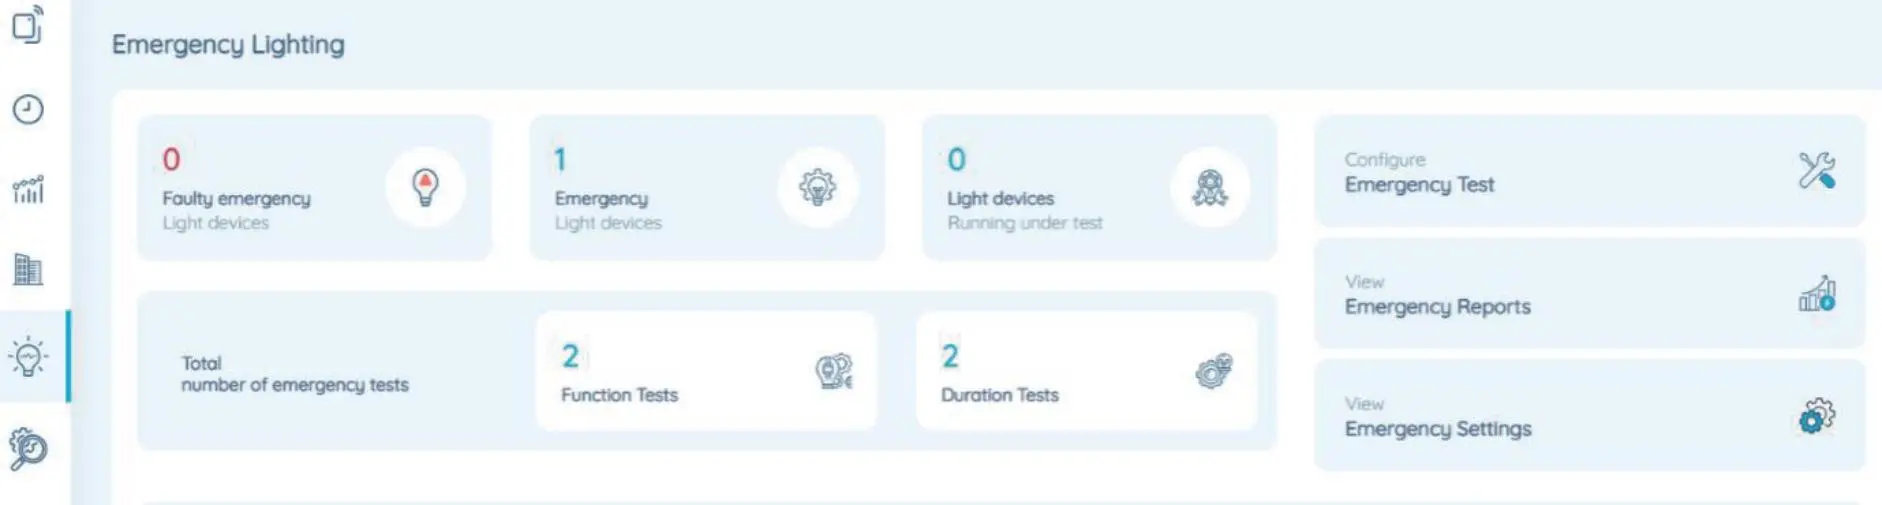
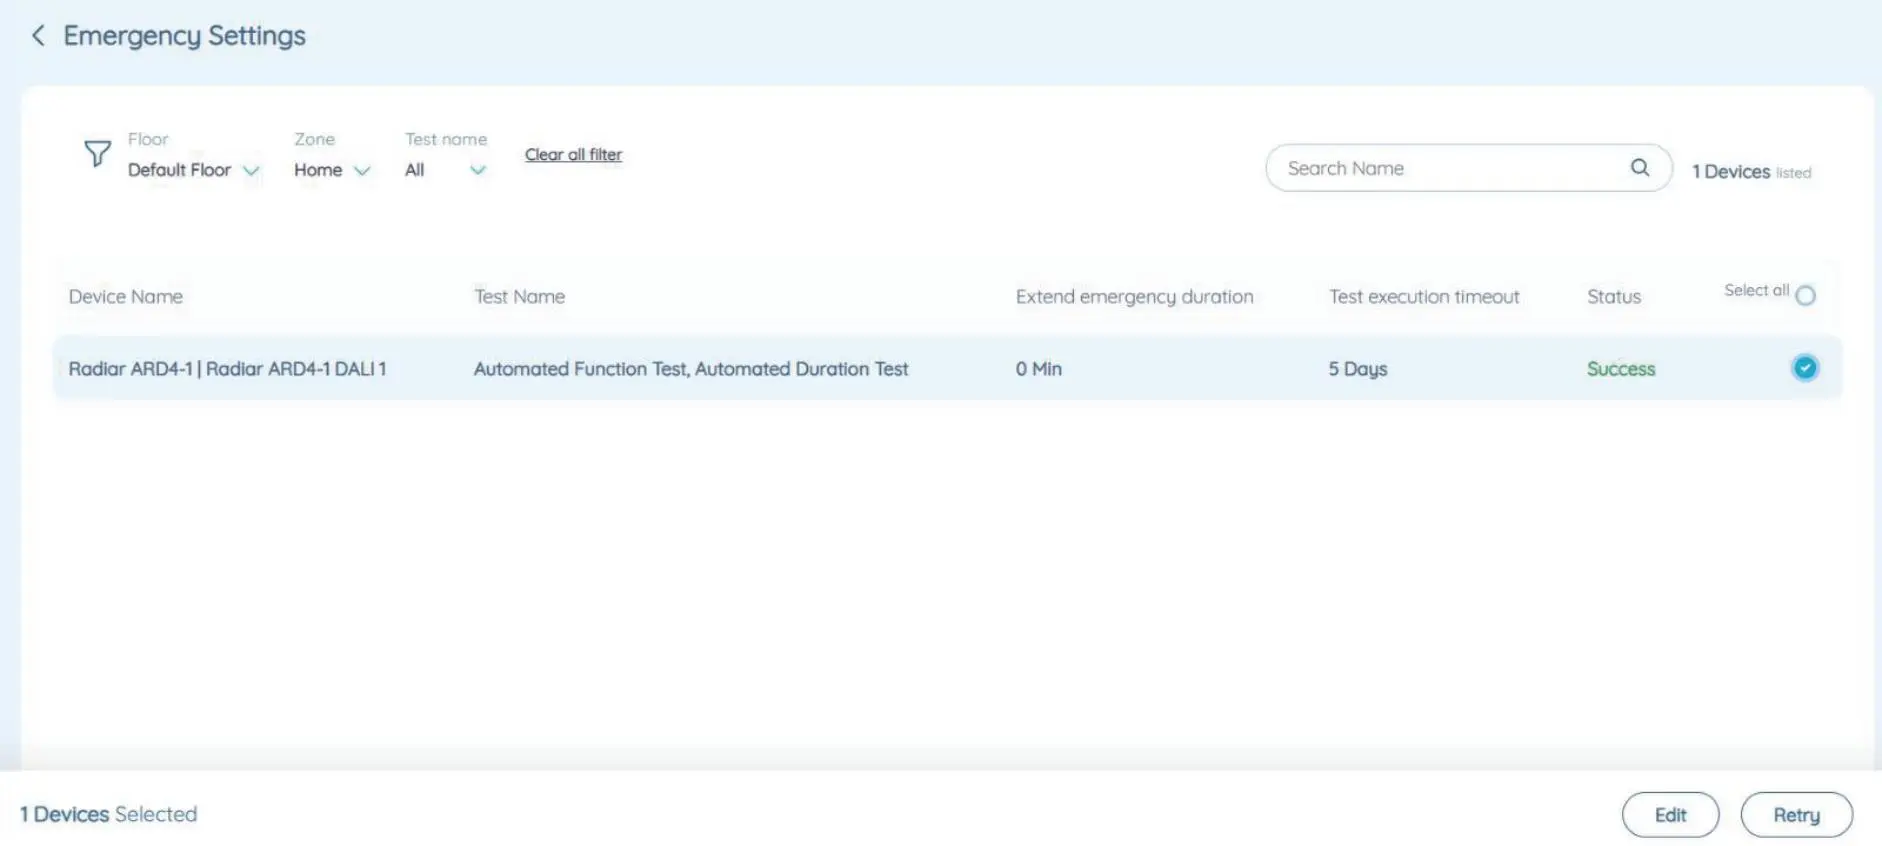
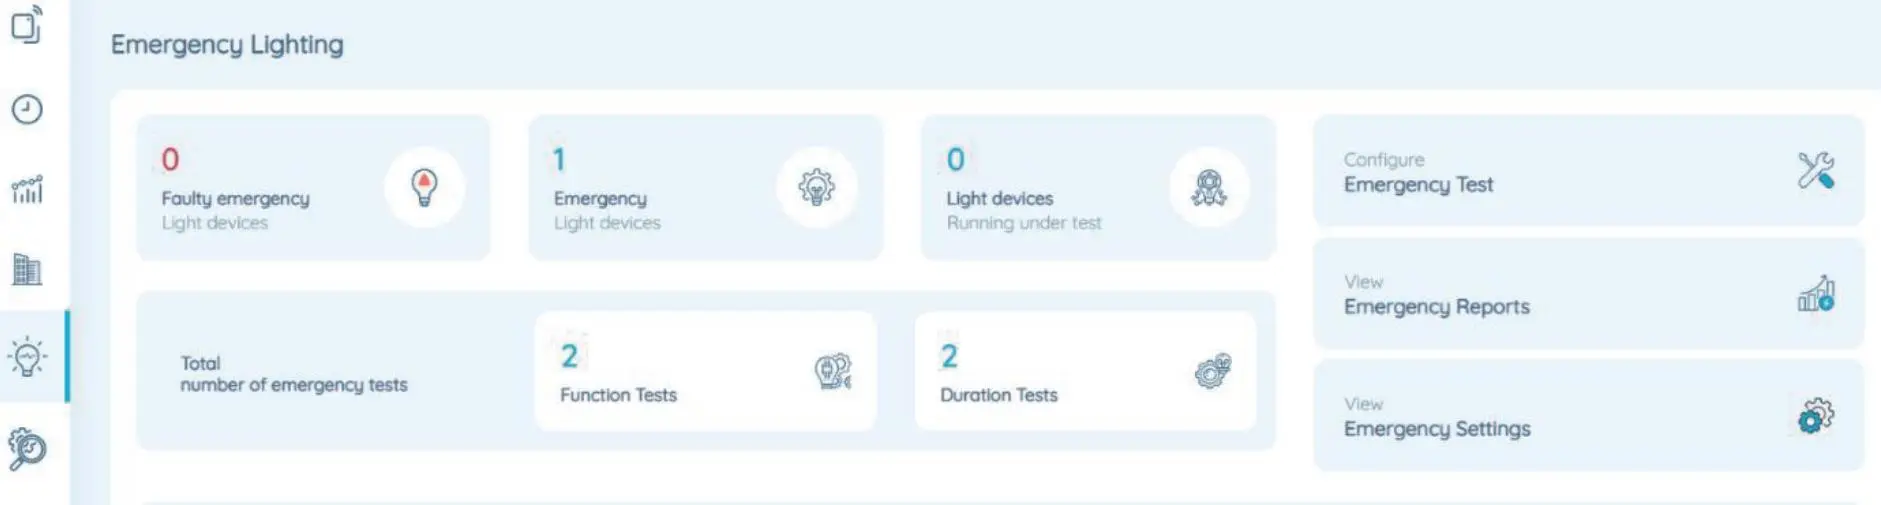
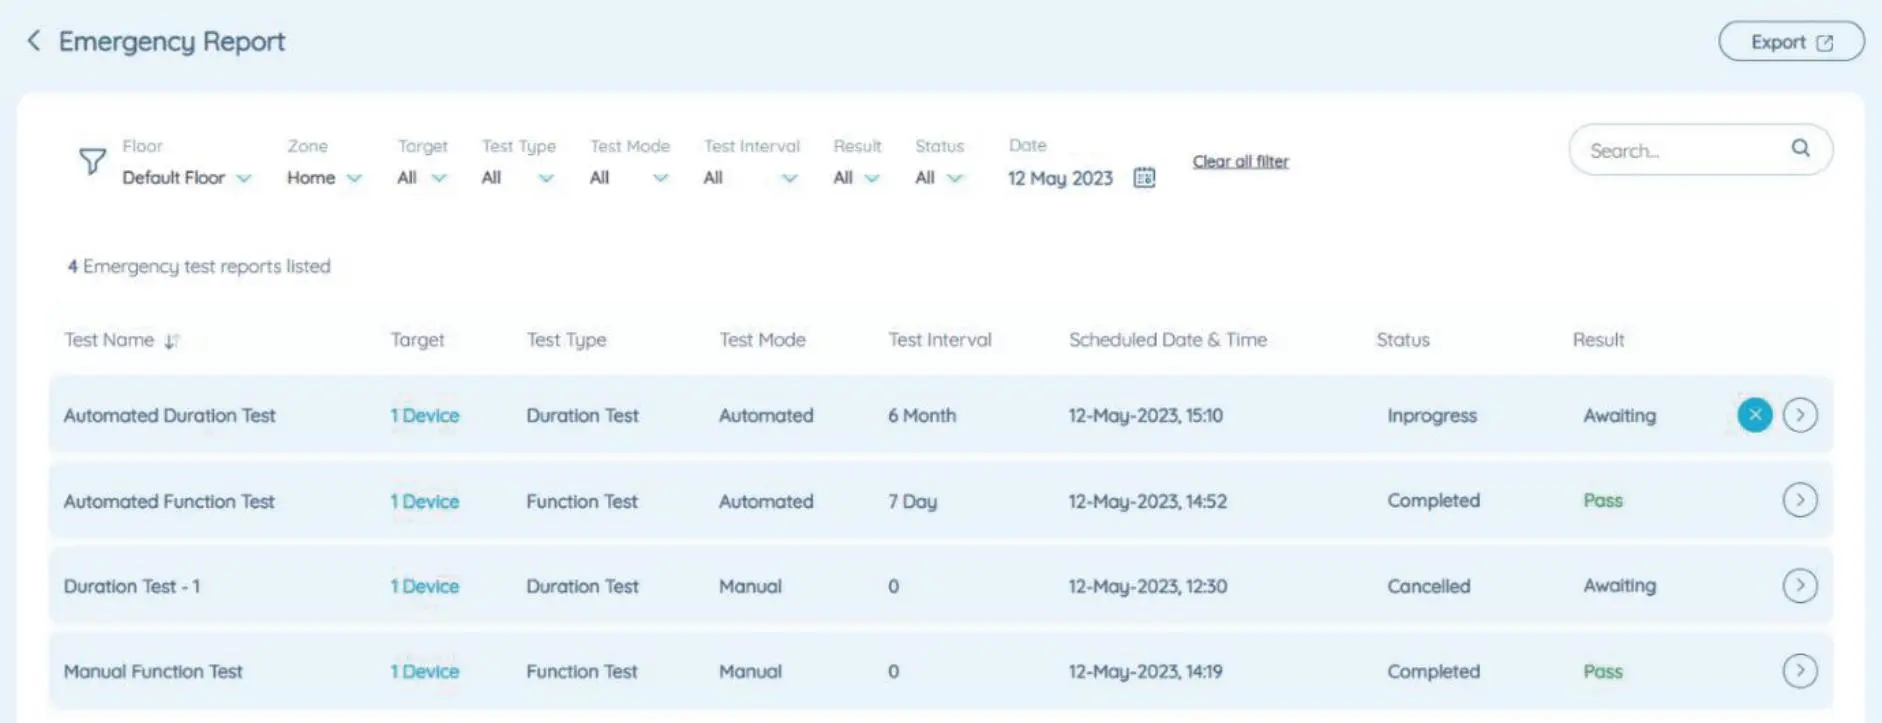
2. Type of Emergency Tests that can be done using the SmartProControls Smart Emergency System 


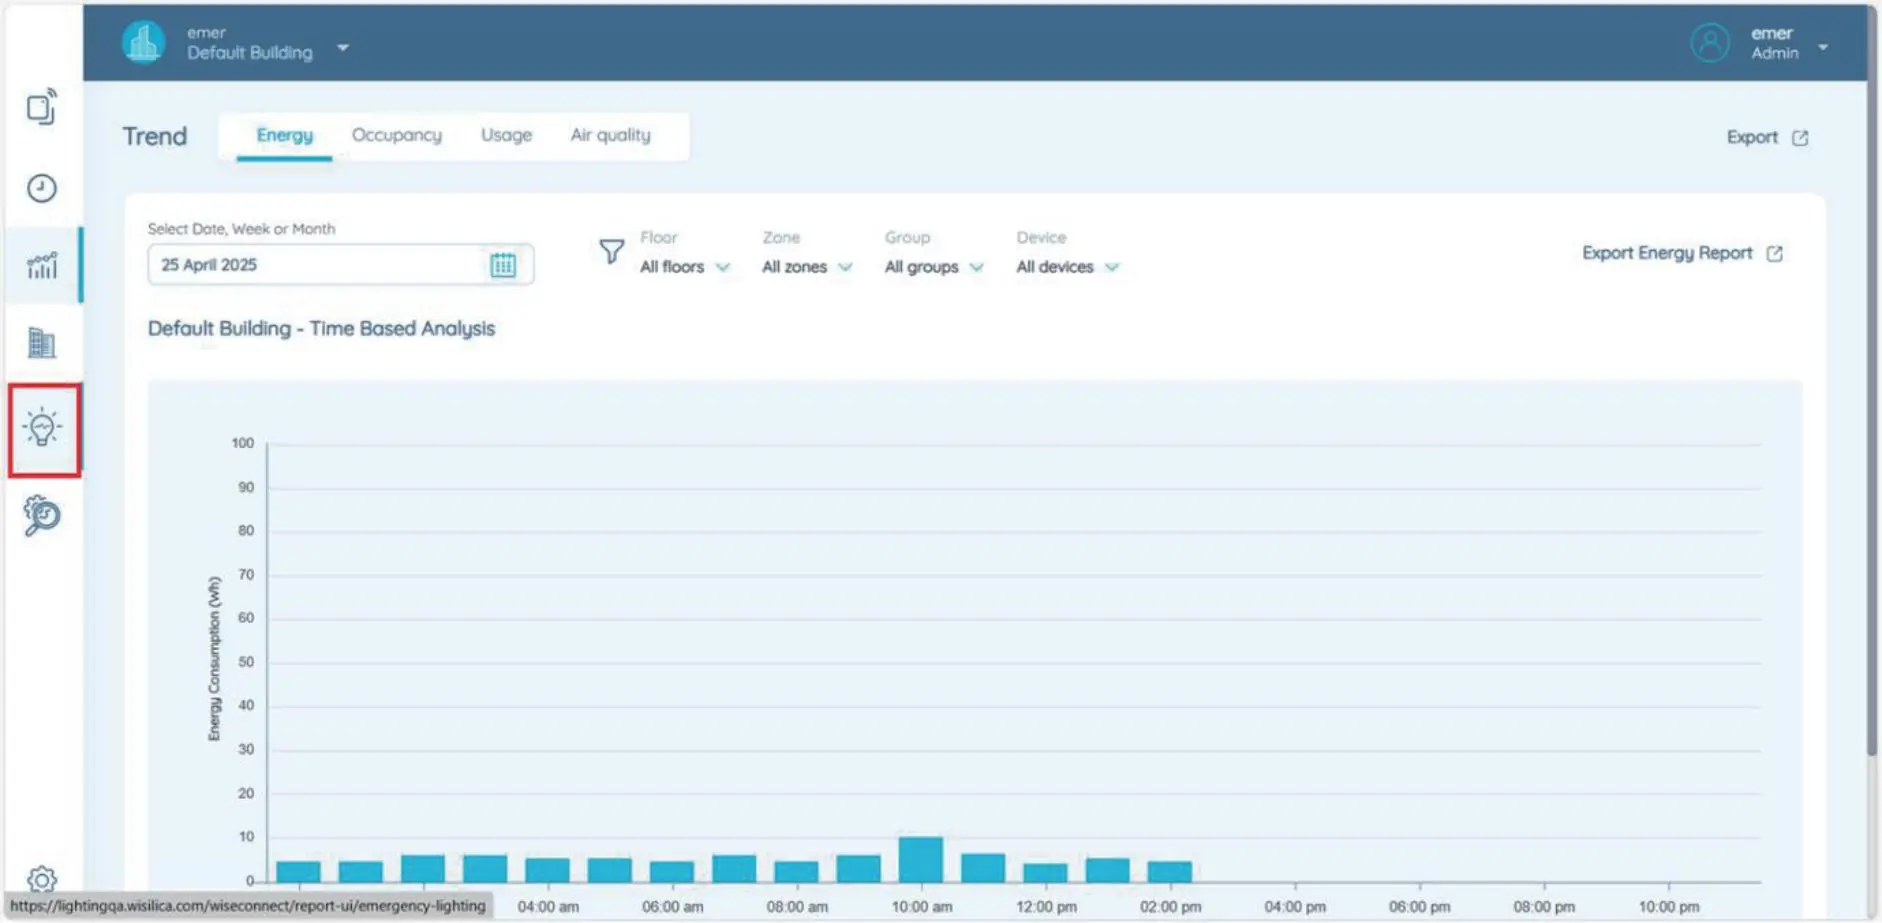
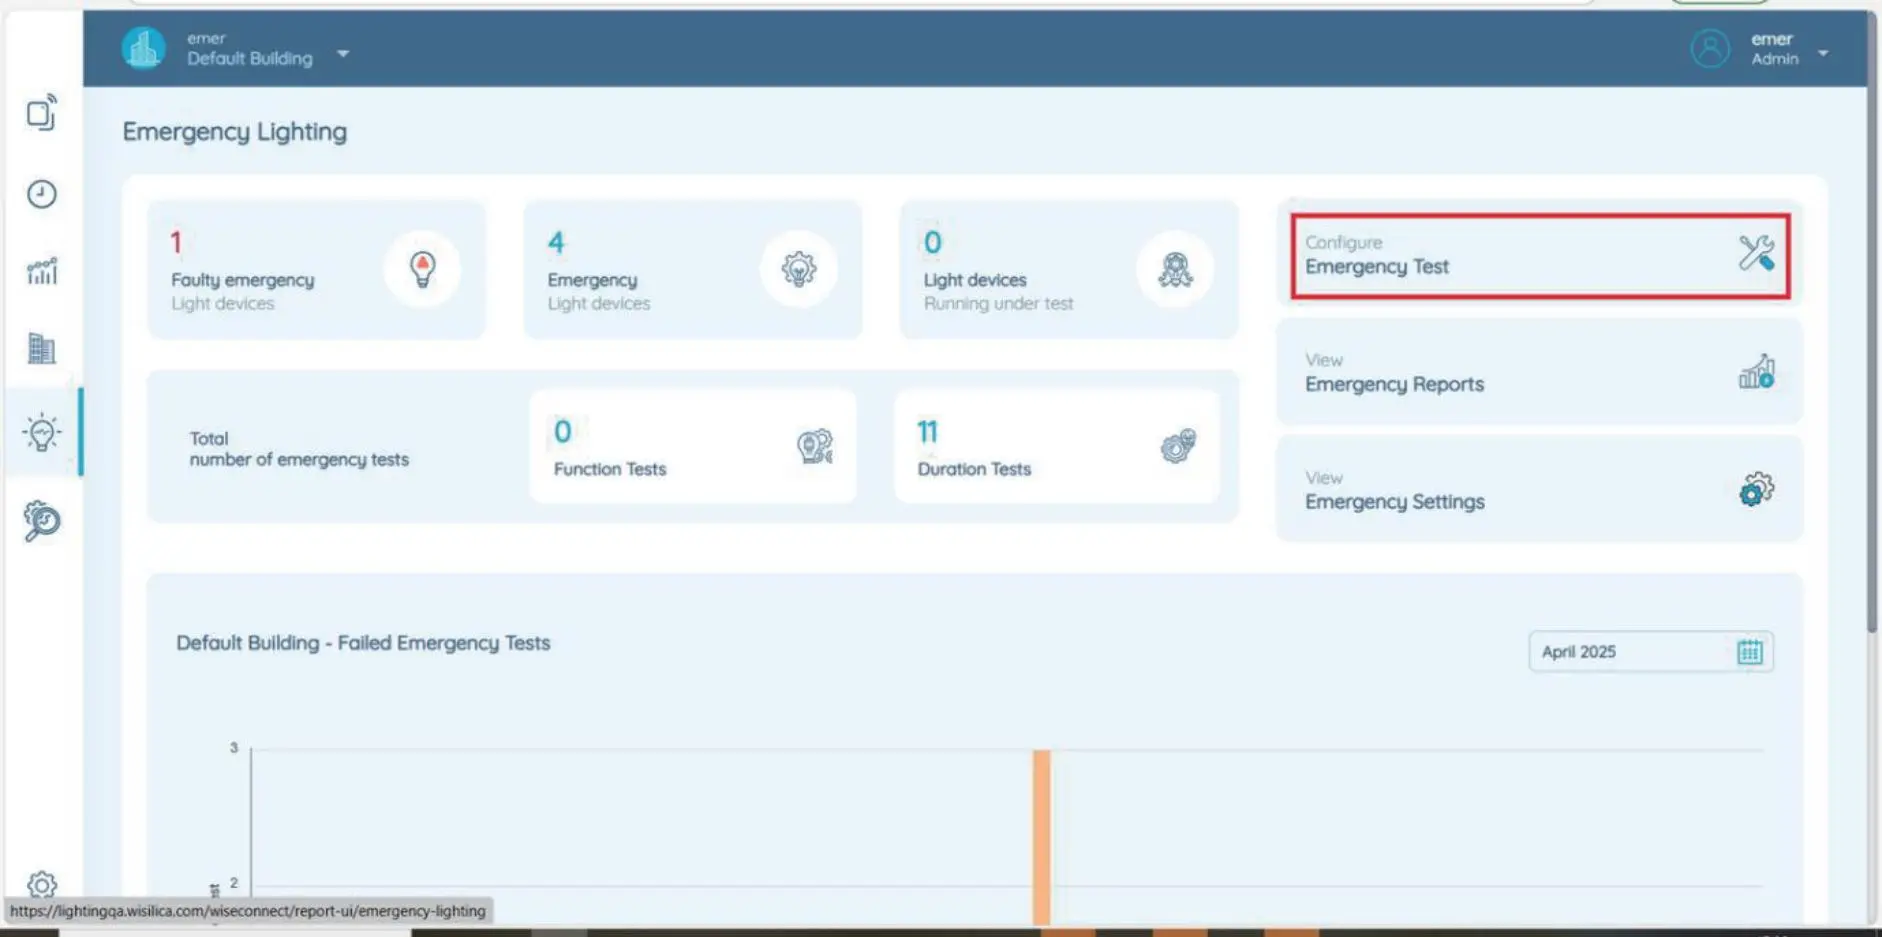
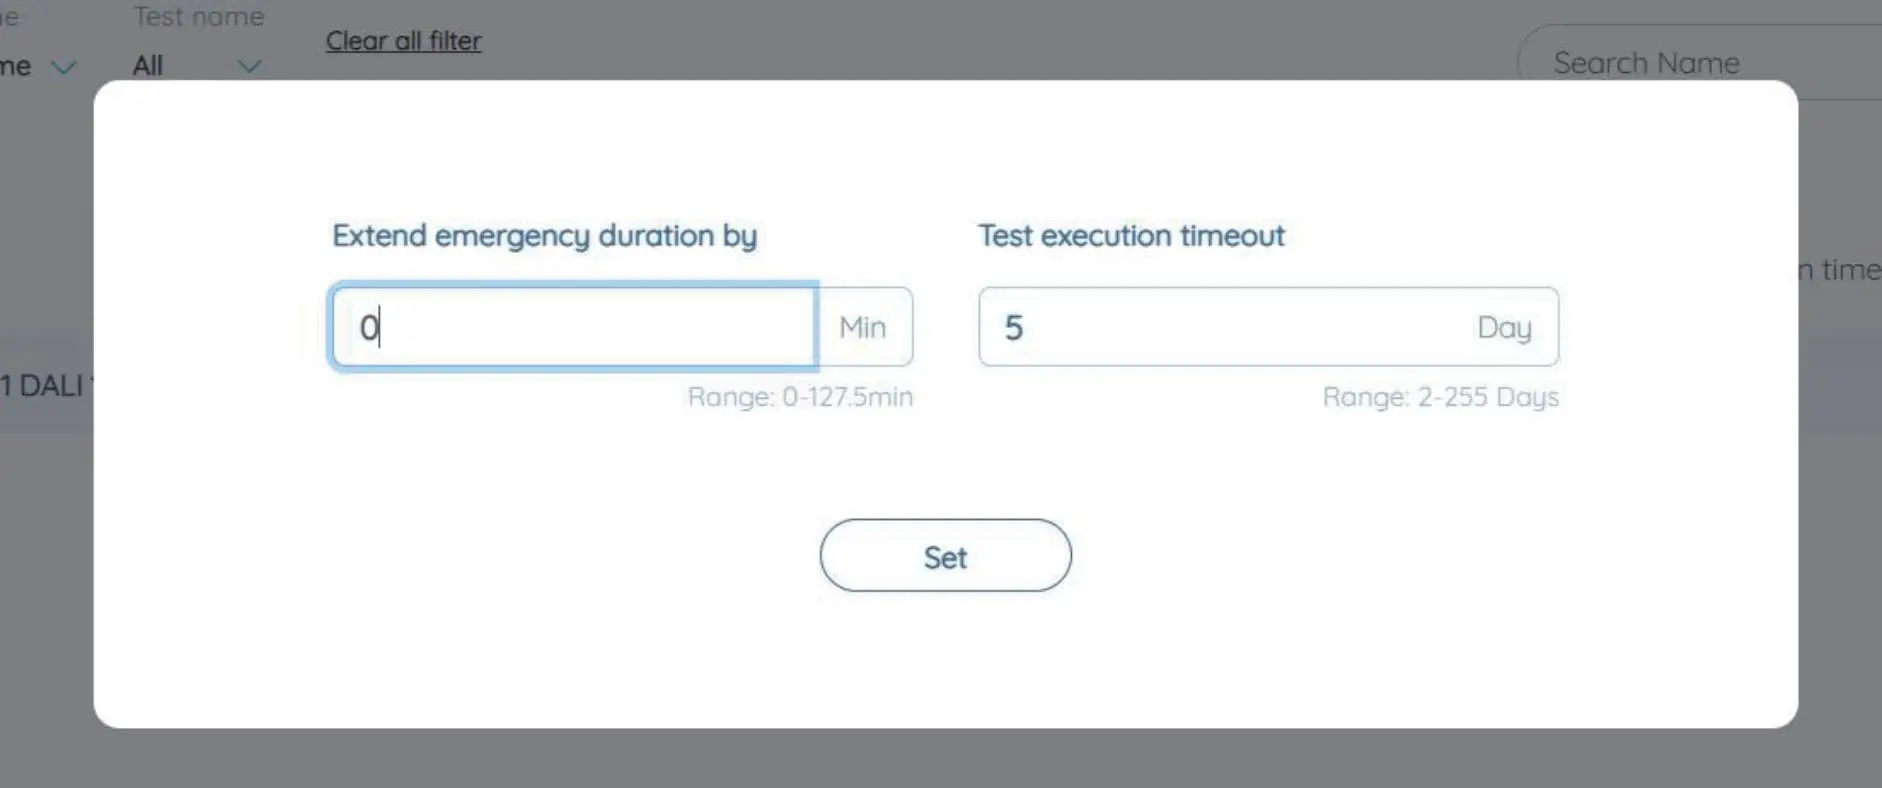
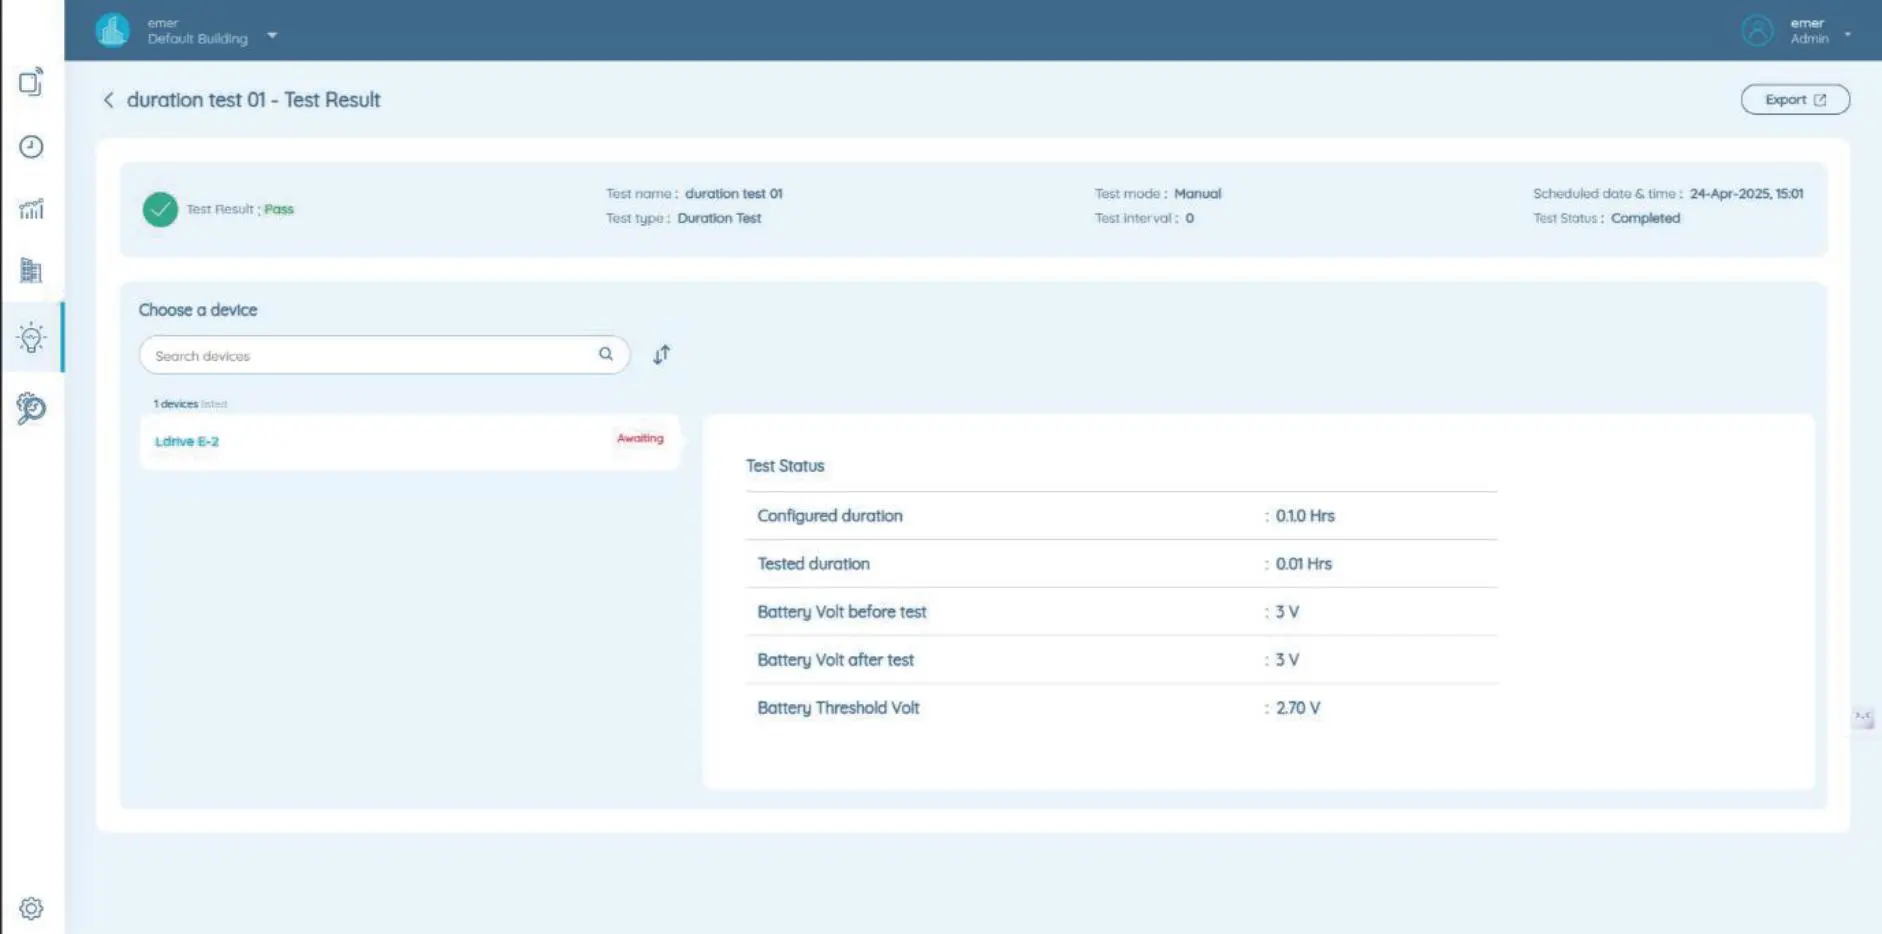
SmartProControls allows you to perform both Function and Duration Tests using the SmartProControls system. The tests can be done from either the mobile app or from the Web UI.


1. Function Test: A function test is a quick test that usually takes between a few seconds to 1 min to complete. This test checks the operation of the emergency light source from the battery supply and gives quick feedback on the device, battery and lamp statuses

2. Duration Test: A duration test is a longer test which takes 1-3 hours and is usually carried out annually. This test can give feedback on the device's current battery status, lamp status and ensures that the battery will be able to operate the lamp for the full rated duration


Both the above-mentioned tests can be configured manually or automatically. Manual tests run once and the result can be viewed on the Web UI. Automated tests are done periodically and the result of each instance of the test can be viewed from the Web UI.


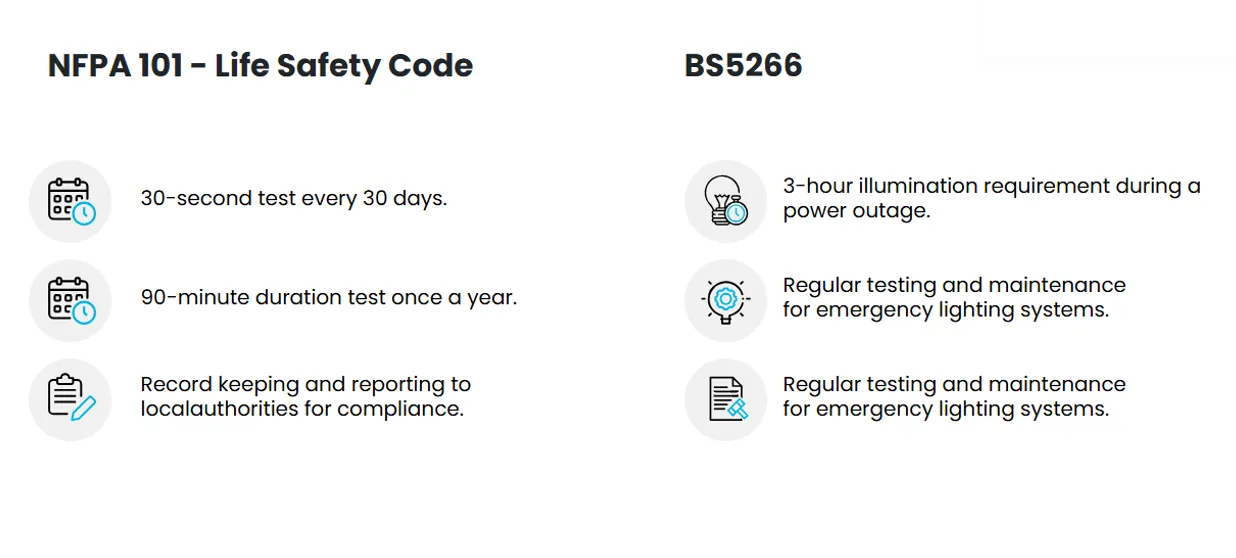
Compliance At a Glance

3. Commissioning the device

3.1 Commissioning LDrive E

1. Power the device, and it will be in pairing mode, ready to be commissioned

2. Choose the zone into which you want to commission the device from the top right corner of the app

3. Go to the 'Devices' tab in the app

4. Click on 'Tap here', and the device will be listed

5. Press the '+' button corresponding to the device, and the device will be commissioned

3.2 Commissioning DALI Emergency Controller
1. Power the device, and it will be in pairing mode, ready to be commissioned
2. Choose the zone into which you want to commission the device from the top right corner of the app
3. Go to the 'Devices' tab in the app
4. Click on 'Tap here', and the device will be listed
5. Press the '+' button corresponding to the device, and the device will be commissioned 
4. Create Emergency Tests from the mobile app
Creating Emergency Test from the from the Mobile App – LDrive E
Emergency tests created in the mobile can only be configured at device level and cannot be done in
groups. Internet connection is required so as to view the results of these tests in the Web UI.
1. Go to the 'Devices' tab
2. The icon of the Emergency Controller will be in red to indicate that at least one of its child
devices supports emergency lighting
3. Click on the settings icon
4. Select 'Additional Settings' and choose 'Emergency Settings
5. Select the type of test to be done
1. Function Test: A function test is a quick test that usually takes between a few seconds to 1 min to complete. This test checks the operation of the emergency light source from the battery supply and gives quick feedback on the device, battery and lamp statuses
2. Duration Test: A duration test is a longer test which takes 1-3 hours and is usually
carried out annually. This test can give feedback on the device's current battery status, lamp status and ensures that the battery will be able to operate the lamp for the full rated duration
6. Click on the 'Start' and enter a name for the test. This will immediately start the test. The test results will be available in the Web UI.
5. Creating Emergency Test from the from the Mobile App – DALI Emergency Controller
6. Create Emergency Tests from the Web UI
1. Log in to the Web UI with your username and password
2. From the left navigation panel, Go to Emergency Lighting 
3. Go to 'Configure Emergency Test' from the Emergency Lighting dashboard in the UI
4. Click on the '+' button on the bottom right corner to create a new test
From here you can set up both Function and Manual tests
6.1 Create Function Tests from the Web UI
6.1.1 Create Emergency Tests from the Web UI - LDrive E
Manual Function Tests
1. Configure the test type and test mode as Function Test and Manual respectively. After
entering the name of the test and choosing the desired options, click on 'Next' 
2. Choose Target Devices: The target devices can be chosen from the required Floor and Zone. The target can be a group or device and can be chosen as desired. The groups with at least one emergency light will be listed when 'Group' is selected (as shown in the first screen). OR The device can be chosen on selecting the 'Device' option (as shown in the second screen given) 
3. Click on 'Save' to choose the child device and then on 'Next' on the bottom right corner of the screen
4. The test configured can be reviewed here. In case of any changes or edits to be done, click on the 'Back' option to go back and make the required changes. The test will be initiated soon after pressing the 'Start Test' button
Automated Function Tests
1. Emergency Tests can be automated to run at regular intervals of time. The test type and test mode can be configured as Function Test and Automated, respectively. The Date, time and the interval of the test can be set.
2. Choose Target Devices: The target devices can be chosen from the required Floor and Zone. The target can be a group or device and can be chosen as desired. The groups with at least one emergency light will be listed when 'Group' is selected. The child device can be chosen on selecting the 'Device' option
3. Click on 'Next' on the bottom right corner of the screen
4. The test will be initiated.
5. You can review the test details and click on confirm once the details of the test have been verified
6.1.2 Create Emergency Tests from the Web UI – DALI Emergency Controller
Manual Function Tests
1. Configure the test type and test mode as Function Test and Manual respectively. After entering the name of the test and choosing the desired options, click on 'Next'
2. Choose Target Devices: The target devices can be chosen from the required Floor and Zone. The target can be a group or device and can be chosen as desired. The groups with at least one emergency light will be listed when 'Group' is selected (as shown in the first screen). OR The child device can be chosen on selecting the 'Device' option (as shown in the second screen given)
3. Click on 'Save' to choose the child device and then on 'Next' on the bottom right corner of the screen
4. The test configured can be reviewed here. In case of any changes or edits to be done, click on the 'Back' option to go back and make the required changes. The test will be initiated soon after pressing the 'Start Test' button
Automated Function Tests
1. Emergency Tests can be automated to run at regular intervals of time. The test type and test mode can be configured as Function Test and Automated, respectively. The Date, time and the interval of the test can be set.
2. Choose Target Devices: The target devices can be chosen from the required Floor and Zone. The target can be a group or device and can be chosen as desired. The groups with at least one emergency light will be listed when 'Group' is selected. The child device can be chosen on selecting the 'Device' option
3. Click on 'Next' on the bottom right corner of the screen
4. The test will be initiated.
5. You can review the test details and click on confirm once the details of the test have been verified
 
IEC 62034 stipulates that a Function test must be performed at least once per month. EN 50172
stipulates that a Function test must be performed at least once per week
 
6.2 Create Duration Tests from the Web UI
6.2.1 Create Duration Tests from the Web UI – LDrive E
Duration Tests in Manual Mode
1. The test type and test mode should be configured as Duration Test and Manual mode,
respectively
2. Choose Target Devices: The target devices can be chosen from the required Floor and Zone.
The target can be a group or device and can be chosen as desired. The groups with at least one emergency light will be listed when Group is selected. The child device can be chosen on selecting the Device option
3. Once you have selected the target devices, you can click on the 'Next' button and do a review of the test configured
Duration tests in Automated Mode
1. Duration tests can also be automated to run at required intervals of time. The test type and test mode should be configured as Duration Test and Automated, respectively. The Date, time and the interval of the test can be set
2. Choose Target Devices: The target devices can be chosen from the required Floor and Zone.
The target can be a group or device and can be chosen as desired. The groups with at least one emergency light will be listed when Group is selected. The child device can be chosen on selecting the Device option
3. Once the targets have been chosen, click on 'Next' to review the test configuration and verify
 
6.2.2 Create Duration Tests from the Web UI – DALI Emergency Controller
Duration Tests in Manual Mode
1. The test type and test mode should be configured as Duration Test and Manual mode, respectively
2. Choose Target Devices: The target devices can be chosen from the required Floor and Zone. The target can be a group or device and can be chosen as desired. The groups with at least one emergency light will be listed when 'Group' is selected. The child device can be chosen on selecting the 'Device' option
3. Once you have selected the target devices, you can click on the 'Next' button and do a review of the test configured
Duration tests in Automated Mode
1. Duration tests can also be automated to run at required intervals of time. The test type and test mode should be configured as Duration Test and Automated, respectively. The Date, time and the interval of the test can be set
2. Choose Target Devices: The target devices can be chosen from the required Floor and Zone. The target can be a group or device and can be chosen as desired. The groups with at least one emergency light will be listed when 'Group' is selected. The child device can be chosen on selecting the 'Device' option
3. Once the targets have been chosen, click on 'Next' to review the test configuration and verify
7. Configure Emergency Test Settings
1. Click on Emergency Settings from Emergency Lighting dashboard Configure
2. Select the device whose settings are to be changed and click on the 'Edit' button 
3. The Test execution timeout time and the emergency duration time to be extended can be set
Test execution Timeout: It is the time allowed for the test to be completed. If the test runs after this specified time, the test will be executed and will be considered as failed.
Extend Emergency Duration by: This option can be used to extend the duration for which you want  the lights to be in emergency lighting mode even after the power is restored.
Once the settings have been changed, the status will show 'Pending' or 'Retry'. The status will change to 'Success' indicating that the set values have been communicated to the device. In case of any failures, the status will change to 'Retry'. The 'Retry' option on the bottom right can be used to retry and make sure that the values are sent to the devices again.
8. View Emergency Test Reports
Click on 'View Emergency Reports'
2. The results, status and the details of the Emergency tests can be viewed from here
3. Click the arrow corresponding to an Emergency test to get more insights about the test